10 Essential Microsoft Excel 2010 Tips for Beginners


excel 

I think this article is useful for beginners, intermediate and even advanced.  I transcribe original  in English

If words like «grids,» «cells,» «data,» and «formula» crawl under your skin like a bad case of the heebie-jeebies, chances are you’ve been a victim of Microsoft Excel. A bad experience with Excel can haunt you the same way the smell of a certain alcohol turns your stomach years after the last time you overindulged.

Microsoft Excel, one of the foundational programs in Microsoft Office, is a wickedly powerful program—»wicked» in that it can do dozens upon dozens of time-saving stunts that most people, unfortunately, never learn. What’s more, when you do learn a new trick in Excel, you can forget it within days if you don’t practice it. It’s a matter of use-it-or-lose-it. The ten essential tips and tricks in this article are here to stay; you might want to bookmark this page so you can refer back to the instructions and helpful screenshots for a day when you’re skills get rusty.

While beginners can appreciate the ten tips we’ve put together here for you, intermediate and advanced users may also discover something new, too. Some examples of what’s covered in this list of tips are: how to customize Excel’s default workbook, how to toggle between results and the formula that create them, and how to alphabetize or sort (i.e., «filter») a spreadsheet based on a single column’s data. If those tips sound too rudimentary for you, see the end of this article for links to other tips for intermediate and advanced Excel users. You can either read our tips in the slideshow below or page through them in the Table of Contents


Contents:

By Jill Duffy, Edward Mendelson

http://www.pcmag.com/article2/0,2817,2386988,00.asp

10 Consejos esenciales para principiantes de Microsoft Excel 2010


excel

Si palabras como «redes», «células», «datos», y arrastre «fórmula»  están debajo de su piel, como un caso grave de pelos de punta, lo más probable es que usted ha sido víctima de Microsoft Excel. Una mala experiencia con Excel puede perseguir de la misma forma en que el olor de un determinado alcohol revuelve  su estómago  años después de la última vez que se excedió.

Microsoft Excel, uno de los programas fundamentales de Microsoft Office, es una maldad potente programa-«malo», ya que puede hacer docenas y docenas de trucos de ahorro de tiempo que la mayoría de la gente, que por desgracia, nunca aprenden. Es más, cuando logra  aprender un nuevo truco en Excel, puede olvidarselo que en cuestión de días, si no lo practica. Es una cuestión de use-ésto-o-pierda-ésto.

Los diez consejos básicos y trucos en este artículo están aquí para quedarse, es posible que desee marcar esta página para que pueda hacer referencia a las instrucciones y capturas de pantalla útiles para un día cuando estás habilidades se le oxiden

Mientras que los principiantes pueden apreciar los diez consejos que hemos puesto juntos a su disposición, los usuarios intermedios y avanzados también pueden descubrir algo nuevo, también. Algunos ejemplos de lo que está cubierto en esta lista de consejos son: cómo personalizar libro de trabajo de Excel por defecto, la forma de alternar entre los resultados y las fórmulas que los crean, y cómo ordenar alfabéticamente o especie (es decir, «filtros») una hoja de cálculo en base a un solo los datos de la columna. Si los consejos suenan demasiado rudimentario para usted, vea el final de este artículo para obtener enlaces a otros consejos para los usuarios intermedios y avanzados de Excel. Usted puede leer nuestros consejos en la presentación de diapositivas o una página a través de ellos en la tabla de contenido

Contents

Por Jill Duffy, Edward Mendelson

http://www.pcmag.com/article2/0,2817,2386988,00.asp

Ciclos en Small Basic (código)


while


En general, se utiliza un ciclo For..EndFor (Para…Fin del Para) para ejecutar el mismo código un número específico de veces. Para manejar este tipo de ciclo, se crea una variable que sigue las veces que el ciclo se haya ejecutado.

Si no sabe el número de repeticiones del ciclo antes de escribir un programa, puede crear un ciclo While (Mientras) en lugar de un ciclo For.

Cuando se crea un ciclo While, se especifica una condición que ocurre cuando comienza el ciclo. Sin embargo, el ordenador evalúa la condición cada vez que se repite el ciclo. Cuando la condición ya no se cumple, el ciclo se detiene.

  1. Textwindow.Title =»Ciclos en Small Basic»
  2. a  = 10
  3. While (a <= 100)
  4. TextWindow.WriteLine(a)
  5. a = a +10
  6. EndWhile

Small Basic: What is a Stack ? (code example)


a1

This article covers the basic use of the Small Basic Stack, with an example recursively finding all jpg image files in and below an initial directory.

What is a Stack

A stack is an ordered list where entries are added (pushed) and retrieved (popped) in a last-in first-out order.  The name stack come from the fact that it is like a stack of plates.  When we add a plate it goes on the top and when we remove a plate it is the last one added that is removed.

A stack is useful to store things that we want process gradually as we unwind the stack, retrieving things to process.  Often the things to add to the stack are not known at the start, but are the result of processing previous stack values.  If we knew them all at the start we could just put them in an array.

Stack methods

Only three methods are present, they are:

  • count = GetCount(stackName) – the number of items present in the stack.
  • PushValue(stackName, value) – add a value to the stack.
  • value = PopValue(stackName) – retrieve a value and remove it from the stack.

The stackName is a string, that is something enclosed in double quotes, for example «my_stack».  The value may be any Small Basic variable or value.

Example

We want to create an array with all of the jpg image files in a directory and all sub-directories, searching all folders recursively.

First we create an empty array to store the image file paths and the number of files in it (zero to start with).  We also set the starting folder to search and add it to a stack we call «folders».  In this example the starting folder location is the folder where the Small Basic source file is saved (Program.Directory).

images = «»

imageCount = 0

startFolder = Program.Directory

Stack.PushValue(«folders»,startFolder)

Next we want to keep working while we have folders still to check, or the stack still has some folders in it.  We use a while loop for this.  Inside the while loop we want to process the last folder added, so it will be popped first.

While Stack.GetCount(«folders») > 0

currentFolder = Stack.PopValue(«folders»)

‘ More work to do here

EndWhile

We now want to process this folder; first we get all the sub-folders in the current working folder and push these onto the stack for later checking as the while loop repeats.

folders = File.GetDirectories(currentFolder)

For i = 1 To Array.GetItemCount(folders)

Stack.PushValue(«folders»,folders[i])

EndFor

Having added the sub-folders to check later as the stack unwinds, we find all the files in the current working folder and add ones ending in «.jpg» to the array list.  We check the file by first converting to lower case, in order to include all case variants of jpg JPG etc.

files = File.GetFiles(currentFolder)

For i = 1 To Array.GetItemCount(files)

fileName = files[i]

fileNameLower = Text.ConvertToLowerCase(fileName)

If (Text.EndsWith(fileNameLower,».jpg»)) Then

imageCount = imageCount+1

images[imageCount] = fileName

EndIf

EndFor

Finally we print out the results, and below is the whole thing.

images = «»

imageCount = 0

startFolder = Program.Directory

Stack.PushValue(«folders»,startFolder)

While Stack.GetCount(«folders») > 0

currentFolder = Stack.PopValue(«folders»)

folders = File.GetDirectories(currentFolder)

For i = 1 To Array.GetItemCount(folders)

Stack.PushValue(«folders»,folders[i])

EndFor

files = File.GetFiles(currentFolder)

For i = 1 To Array.GetItemCount(files)

fileName = files[i]

fileNameLower = Text.ConvertToLowerCase(fileName)

If (Text.EndsWith(fileNameLower,».jpg»)) Then

imageCount = imageCount+1

images[imageCount] = fileName

EndIf

EndFor

EndWhile

For i = 1 To Array.GetItemCount(images)

TextWindow.WriteLine(images[i])

EndFor

http://social.technet.microsoft.com/wiki/contents/articles/15066.small-basic-stack-basics.aspx

¡ Gracias Excel Total !. Excelente sitio


excel

exceltotal

https://www.facebook.com/ExcelTotal?hc_location=stream    Excel Total

Es inevitable encontrarse con errores en Excel, pero es importante saber la razón por la que se muestran y cómo solucionar el problema. Aprende más sobre los errores de Excel en las siguientes publicaciones:

http://exceltotal.com/errores-en-formulas-parte-1/
http://exceltotal.com/errores-en-formulas-parte-2/

Aprende a programar con el lenguaje más sencillo (Softonic)


a2

La enseñanza de la programación puede seguir dos vías distintas: una pasa por el uso de metáforas gráficas, mientras que la otra prefiere código simplificado.

Microsoft Small Basic apuesta por este último camino, presentando un dialecto de Basic reducido a tan solo 15 funciones para dibujo bidimensional, la reproducción de sonidos y cálculos aritméticos. Para instalarlo en español, hay que elegir el paquete de idioma durante la instalación.

Es un programa muy util y sencillo para introducir a las personas que no tienen conocimiento, previo alguno.

  • Usabilidad   10
  • Estabilidad 8,7
  • Instalación 10
  • Funciones  6,2
  • Apariencia 10

http://microsoft-small-basic.softonic.com/

Small Basic: Text Basics – Featured Article


TICFind the latest and complete version of this article here, on TechNet Wiki:

Small Basic: Text Basics

Introduction

Text is a series of characters, often called a string in computing.  A string can be a constant (or literal) enclosed within a set of double quotes, or a variable can be assigned to hold a string.

txt = «Hello World»

Above, txt is a variable that contains the string literal «Hello World».

As stated, the string contains a set or characters, in the example above there are 11 characters, ‘H’, ‘e’, ‘l’, ‘l’, ‘o’, ‘ ‘, ‘W’, ‘o’, ‘r’, ‘l’ and ‘d’.

A string can also be a series of numbers such as «3.14159», or even contain special characters like backspace, newline, ‘♥’ or even a system beep.  These are not to be confused with the different representations of the characters that different fonts can provide, including different language fonts like the symbol font.

Each character is identified internally by a ‘character code’ or number, often called ASCII or UNICODE number.

We often want to form one string from others or query a string to see what it contains.

See more in    http://blogs.msdn.com/b/smallbasic/archive/2013/05/28/small-basic-text-basics-featured-article.aspx

Small Basic: Challenge of the Month – May 2013


tennis_ball

Tennis Ball   ‘Copyright (c) 2013 Nonki Takahashi. All rights reserved.

  • Physics Challenge

Back to basics – write a program where a ball can roll down an inclined slope – use an image for the ball and show it rotating as it accelerates while rolling.  To make it tougher try the ball on different angled slopes – it should accelerate faster on the steeper slopes.

Download this program from

http://smallbasic.com/program/?NZR510

Small Basic: juego on- line en 3D


3D

3D RayCaster Maze – Featured Small Basic Game

Echa un vistazo a este fantástico juego de 3D ​​en tiempo real (que se ejecuta en línea).  Por Old Basic Coder  ( tester de software)

http://blogs.msdn.com/b/smallbasic/archive/2013/05/27/3d-raycaster-maze-featured-small-basic-game.aspx

Hice un programa de tipo «3D Maze» como ejercicio. No había nada programado para unos 25 años, nos apetecía volver a estar en ella, y descargar la versión gratuita de Visual Studio. Se apareció con la opción de SmallBASIC, así que pensé que empezaría el primero.
Descarga el código del programa de : http://smallbasic.com/program/?DWV967

Small Basic: eventos de teclado (código de ´programa)


key

Usamos la operación Move (desplaza al rectángulo) y Keydown y Keyup que lo gira 90 grados y después lo vuelve a su lugar, usando cualquier tecla

  1. GraphicsWindow.Height =300
  2. GraphicsWindow.Width = 300
  3. GraphicsWindow.BackgroundColor = «Yellow»
  4. forma1 = Shapes.AddRectangle(100,50)
  5. Program.Delay(1000)
  6. Shapes.Move(forma1, 100,125)
  7. return = «Return»
  8. GraphicsWindow.KeyDown = keydown
  9. GraphicsWindow.KeyUp = keyup
  10. Sub keydown
  11.   If GraphicsWindow.LastKey = return Then
  12.     Shapes.Rotate(forma1, 90)
  13.   EndIf
  14. EndSub
  15. Sub keyup
  16.   If GraphicsWindow.LastKey = return Then
  17.     Shapes.Rotate(forma1, 0)
  18.   EndIf
  19.   EndSub

Un nuevo blog se presentó a MS Small Basic


a1
Asunto: Campamentos Básicas de aprendizaje en la Academia Main Stem – Verano 2013
Por: Ed Price – MSFT
Enlace:

http://www.mainstemacademy.com/

Marck McDonald en Main Stem Academia, está enseñando pequeños campos básicos. Cada campamento es impulsado por un tutorial. Los niños pueden inscribirse en cualquier momento o ir a toda la serie. Si asisten a toda la serie, que tendrán el reto con nuevos tutoriales y escenarios cada semana. Ellos usarán técnicas ágiles de gestión de proyectos. Los niños aprenderán cómo diseñar, construir algoritmos, gestionar un proyecto y trabajar algoritmos en un ambiente de equipo, la construcción de una valiosa experiencia para un mundo real, el medio ambiente profesional business.
Visite la página de campamento Small Basic de la página web Academia Tallo principal de información de precios y para registrarse:
http://www.mainstemacademy.com/small-basic/
Aquí están los campamentos de verano 2013:

Campo I (8 de julio – 12)
Campo II (15 de julio – 19)
Campo III (12 de agosto – 16)
Campo IV (19 de agosto – 23)

Para cada campo, los estudiantes pueden asistir el día completo o medio día (por la mañana o por la tarde). Vea el enlace de arriba para las diferencias de precios.

INSTRUCTOR

Mark pasó 28 años en el desarrollo de software, gestión de proyectos y productos, y las implementaciones de software empresarial. Es un Scrum Master y autor de libros de tecnología Certified. Su base de consultoría incluye Boeing, Microsoft, JD Edwards, Chase, Broderbund, CB Richard Ellis, Marina de los EE.UU., Servicio Forestal de los EE.UU., NBBJ, Swedish Medical Center y muchas otras compañías y organizaciones. Le gusta enseñar y ver a los jóvenes a aprender programación, la gestión y el emprendimiento de proyectos.

Herramientas de comparación para Excel (y Access, también)


finally

Las nuevas herramientas de escritorio ofrecen algunas grandes mejoras en la eficiencia. Si usted siempre quiso una forma fácil de comparar 2 hojas de cálculo, ahora lo tiene.

La Hoja de cálculo Compare le permite elegir cualquiera de los 2 libros y los compara en una fracción del tiempo que tomaría para hacerlo manualmente. Además, las diferencias entre las hojas de cálculo se clasifican por lo que es fácil centrarse en los cambios importantes, como los cambios en las fórmulas o VBA. También puede ver los cambios en los datos de las celdas.La  Hoja de cálculo Compare hace que sea fácil de distinguir entre los diferentes tipos de cambios que pueden ocurrir en una hoja de cálculo. Además, la hoja de cálculo Compare es capaz de determinar cuando se han insertado o suprimido filas o columnas y factores de esos cambios en la ecuación antes de comparar las células que puede haber cambiado como resultado. En lugar de mostrar las diferencias sólo porque miles de células se ha movido por una fila, la Hoja de cálculo compare  puede simplemente informar de que se ha insertado una fila.
Compare Database proporciona una capacidad similar para bases de datos Access. Ahora usted puede escoger cualquiera de los 2 bases de datos Access y obtener un informe de las diferencias entre las tablas, consultas, módulos y más. Si alguien cambia una consulta importante, ahora usted puede ver fácilmente exactamente lo que se ha cambiado

http://blogs.office.com/b/microsoft-excel/archive/2013/05/14/new-server-release-spreadsheet-controls-in-office-2013.aspx

¿Cuáles son las características únicas del lenguaje Microsoft Small Basic?


Sin título2

MSDN Blogs > Small Basic > What are the unique features of the Small Basic language?

Ed Price – MSFT Microsoft

Originalmente escrito por el creador de Small Basic, Vijaye Raji …
Aquí están las características únicas del lenguaje Small Basic
Imperativo:

Al igual que las primeras variantes de BASIC, Small Basic es imperativo y no utiliza o expone a los principiantes, a conceptos como ámbitos, tipos, orientación a objetos, etcétera
Tamaño:

El lenguaje Small Basic consta de sólo 14 palabras clave. (keywords)
Tipo de sistema:
Hoy en realidad no lo es. Puede crear cadenas y constantes numéricas y
asignarlos a variables. Las operaciones realizadas en estas variables serán
interpretado de acuerdo con el contenido.

Variables:
Todas las variables son globales y siempre están inicializadas

Pueden ser utilizados antes que están asignadas

.
Eventos

Puede crear una sub-rutina y asignarla a un evento. Esto la llevaría hacia arriba
hasta un evento.
Libreías
Las librerías ofrecen «Objetos» estáticos que el del grupo, propiedades y eventos..

Se pueden crear nuevas librerías  utilizando otros lenguajes de  .NET Framework  y se añaden a la Runtime Small Basic.

http://blogs.msdn.com/b/smallbasic/archive/2013/05/25/what-are-the-unique-features-of-the-small-basic-language.aspx

small basic, Ed Price, Vijaye Raji

Nueva versión del servidor: controles de hoja de cálculo de Office 2013


SUMMARY_SpreadsheetControl_300x166_jpg-550x0

Microsoft Office   Excel Blog    by Excel Team

http://blogs.office.com/b/microsoft-excel/archive/2013/05/14/new-server-release-spreadsheet-controls-in-office-2013.aspx

Este blog fue publicado originalmente en septiembre de 2012, y hemos actualizado, al anunciar el reciente lanzamiento de las aplicaciones de servidor. Se llega a usted gracias Steve Kraynak, Gerente del Programa Oficina se centra en las características de administración de hojas de cálculo.

En abril, hemos lanzado 2 nuevas e importantes aplicaciones de hoja de cálculo de la gestión basada en servidor para complementar las funciones de administración de escritorio de hoja de cálculo que hemos introducido con el lanzamiento de Office 2013.
Ahora están disponibles los de Auditoría y Control Server Management (ACM), y el descubrimiento y evaluación de riesgos, que ambos están diseñados para ayudar a administrar el uso de hojas de cálculo y bases de datos Access. Ahora hay 5 características diseñadas para ayudarle a controlar el uso de hojas de cálculo de Excel y bases de datos Access: Hablamos de estas aplicaciones en un post pasado mes de septiembre, y ahora están disponibles para los clientes:
• Auditoría y Control Management Server (nuevo)
• Evaluación de Descubrimiento y Riesgo (nuevo)
• Hoja de cálculo Consultas
• Hoja de cálculo Comparar
• Base de datos Comparar

El problema de las 8 reinas (código en Small Basic)


chess

El problema 8-Queens en el ajedrez es colocar 8 reinas en un tablero de ajedrez de tal manera que ninguna de las reinas es una amenaza cualquiera de las otras. El problema es que a la entrada de las 8 columnas de las reinas en las filas de un tablero de ajedrez, donde 1 es la primera columna y 8 la última, por ejemplo, 1 2 3 4 5 6 7 8 significa que las reinas están a lo largo de la diagonal, lo cual no sería una solución válida.

http://blogs.msdn.com/b/smallbasic/archive/2013/01/11/queens-chess-challenge-small-basic.aspx

Más información   http://en.wikipedia.org/wiki/Eight_queens_puzzle

Program Listing:  QDX521    http://smallbasic.com/program/?QDX521

1.Principio del formulario

‘ 8-Queens 0.2
‘ Copyright (c) 2012 Nonki Takahashi

‘ History :
‘ 0.2 2013/01/03 Rewrote for 8-Queens probrem. ()
‘ 0.1 2012/08/04 Code for chessmen written in hexadecimal.
‘ 0.0 2012/08/04 25-line version created. (CLP327)

GraphicsWindow.Title = «8-Queens 0.2»
GraphicsWindow.BackgroundColor = «#004C00»
GraphicsWindow.BrushColor = «Black»
oNum = Controls.AddTextBox(440, 30)
num = 12345678
Controls.SetTextBoxText(oNum, num)
InitBoard()
CheckValid()
DrawBoard()
Controls.TextTyped = OnTextTyped

Sub OnTextTyped
num = Controls.GetTextBoxText(oNum)
len = Text.GetLength(num)
correct = «False»
If len = 8 Then
correct = «True»
For i = 1 To 8
If Text.IsSubText(num, Text.GetSubText(«12345678», i, 1)) = «False» Then
correct = «False»
EndIf
EndFor
EndIf
If correct Then
board = «»
For c = 1 To 8
board[Text.GetSubText(num, c, 1)][Text.GetSubText(«abcdefgh», c, 1)] = «BQ»
EndFor
CheckValid()
DrawBoard()
EndIf
EndSub

Sub CheckValid
valid = «True»
For c1 = 1 To 8
For c2 = c1 + 1 To 8
r1 = Text.GetSubText(num, c1, 1)
r2 = Text.GetSubText(num, c2, 1)
dc = Math.Abs(c2 – c1)
dr = Math.Abs(r2 – r1)
If dc = dr Then
valid = «False»
board[r1][Text.GetSubText(«abcdefgh», c1, 1)] = «RQ»
board[r2][Text.GetSubText(«abcdefgh», c2, 1)] = «RQ»
EndIf
EndFor
EndFor
EndSub

Sub DrawBoard
For r = 8 To 1 Step – 1
y = pos[«y0»] + (8 – r) * size
For c = 1 To 8
x = pos[«x0»] + (c – 1) * size
GraphicsWindow.BrushColor = color[Math.Remainder((c + r), 2)]
GraphicsWindow.FillRectangle(x, y, size, size)
p = board[r][Text.GetSubText(«abcdefgh», c, 1)]
If p <> «» Then
GraphicsWindow.BrushColor = color[Text.GetSubText(p, 1, 1)]
sHex = pieces[Text.GetSubText(p, 2, 1)]
Math_Hex2Dec()
GraphicsWindow.DrawText(x, y – size * 0.12, Text.GetCharacter(iDec))
EndIF
EndFor
EndFor
EndSub

Sub InitChessmen
size = 48   ‘ font height and square size
GraphicsWindow.FontSize = size
pieces = «P=265F;N=265E;B=265D;R=265C;Q=265B;K=265A;»
EndSub

Sub InitBoard
pos = «x0=30;y0=30;» ‘ left, top
For c = 1 To 8
board[c][Text.GetSubText(«abcdefgh», c, 1)] = «BQ»
EndFor
color = «W=White;B=Black;R=Red;0=SaddleBrown;1=BurlyWood;»
InitChessmen()
EndSub

Sub Math_Hex2Dec
‘ Math | Convert sHex to iDec
iDec = 0
iLen = Text.GetLength(sHex)
For iPtr = 1 To iLen
iDec = iDec * 16 + Text.GetIndexOf(«0123456789ABCDEF», Text.GetSubText(sHex, iPtr, 1)) – 1
EndFor
EndSub

Sub DumpBoard
For r = 8 To 1 Step -1
For c = 1 To 8
If board[r][Text.GetSubText(«abcdefgh», c, 1)] <> «» Then
TextWindow.Write(board[r][Text.GetSubText(«abcdefgh», c, 1)] + » «)
Else
TextWindow.Write(» «)
EndIf
EndFor
TextWindow.WriteLine(«»)
EndFor
EndSub

Microsoft Small Basic (código de programa)


mariposa


Dibujando mariposas y corazones … USANDO SOLO CÓDIGO – Pequeños programas destacados básicos

ACTUALIZACIONES: Añadido corazón de Nonki como el corazón # 3 el 2/13. Añadido mariposa de Nonki como mariposa # 3 el 2/11.

español


‘Challenge of the Month — February 2013
‘Small Challenge 2
‘Copyright (c) Math Man 2013
width = GraphicsWindow.Width
height = GraphicsWindow.Height
scale = 0.8
InitEllipses()
DrawButterfly()

Sub InitEllipses
ellipse[1] = «pen=Black;brush=Orange;x=»+(width/3-70*scale)+»;y=»+(height/8*5-160*scale)+»;width=»+(140*scale)+»;height=»+(320*scale)+»;angle=60;»
ellipse[2] = «pen=Black;brush=Orange;x=»+(width/3-70*scale)+»;y=»+(height/8*3-160*scale)+»;width=»+(140*scale)+»;height=»+(320*scale)+»;angle=120;»
ellipse[3] = «pen=Black;brush=Orange;x=»+(width/3*2-70*scale)+»;y=»+(height/8*5-160*scale)+»;width=»+(140*scale)+»;height=»+(320*scale)+»;angle=120;»
ellipse[4] = «pen=Black;brush=Orange;x=»+(width/3*2-70*scale)+»;y=»+(height/8*3-160*scale)+»;width=»+(140*scale)+»;height=»+(320*scale)+»;angle=60;»
ellipse[5] = «pen=Black;brush=Black;x=»+(width/3-50*scale)+»;y=»+(height/8*5-170*scale)+»;width=»+(70*scale)+»;height=»+(70*scale)
ellipse[6] = «pen=Black;brush=Black;x=»+(width/3*2-30*scale)+»;y=»+(height/8*5-170*scale)+»;width=»+(70*scale)+»;height=»+(70*scale)
‘ellipse[2] = «pen=;brush=;x=;y=;width=;height=»+»;angle=135;»
‘ellipse[3] = «pen=;brush=;x=;y=;width=;height=»+»;angle=135;»
‘ellipse[4] = «pen=;brush=;x=;y=;width=;height=»+»;angle=45;»
‘ellipse[5] = «pen=;brush=;x=;y=;width=;height=»+»;angle=45;»
‘ellipse[6] = «pen=;brush=;x=;y=;width=;height=»+»;angle=45;»

ellipse[7] = «pen=Black;brush=Black;x=»+(width/2-25*scale)+»;y=»+(height/2-150*scale)+»;width=»+(50*scale)+»;height=»+(300*scale)+»;angle=0″
ellipse[8] = «pen=Black;brush=Black;x=»+(width/2-40*scale)+»;y=»+(height/2-150*scale-40*scale)+»;width=»+(80*scale)+»;height=»+(80*scale)+»;angle=0″
ellipse[9] = «pen=Black;brush=Black;x=»+(width/2-50*scale)+»;y=»+(height/2-150*scale-40*scale-35*scale)+»;width=»+(10*scale)+»;height=»+(90*scale)+»;angle=140″
ellipse[10] = «pen=Black;brush=Black;x=»+(width/2+40*scale)+»;y=»+(height/2-150*scale-40*scale-35*scale)+»;width=»+(10*scale)+»;height=»+(90*scale)+»;angle=40″
numEllipse = Array.GetItemCount(ellipse)
EndSub

Sub DrawButterfly
For i = 1 To numEllipse
GraphicsWindow.PenWidth = 4
GraphicsWindow.PenColor = ellipse[i][«pen»]
GraphicsWindow.BrushColor = ellipse[i][«brush»]
ellipse[i][«shape»] = Shapes.AddEllipse(ellipse[i][«width»],ellipse[i][«height»])
Shapes.Move(ellipse[i][«shape»],ellipse[i][«x»],ellipse[i][«y»])
Shapes.Rotate(ellipse[i][«shape»],ellipse[i][«angle»])
EndFor
EndSub

//

Copyright (c) Microsoft Corporation. All rights reserved.


Small Basic: El objeto Controls – Diccionario (código)


diccionario


Vamos a escribir un simple programa usando el objeto Controls. Este programa puede usarse para saber las definiciones de una palabra dada.

  1. GraphicsWindow.Title = «Diccionario»
  2. GraphicsWindow.Height = 600
  3. GraphicsWindow.Width = 600
  4. GraphicsWindow.DrawText(50, 80, «Escriba una palabra en inglés o francés: «)
  5. cuadroTexto = Controls.AddTextBox(50, 100)
  6. Controls.SetSize(cuadroTexto, 100, 30)
  7. Controls.SetTextBoxText(cuadroTexto, «»)
  8. GraphicsWindow.DrawText(50, 140, «Significados según el diccionario: «)
  9. multitxt = Controls.AddMultiLineTextBox(50, 160)
  10. Controls.SetSize(multitxt, 500, 400)
  11. obtenerDef = Controls.AddButton(«Buscar», 200, 100)
  12. GraphicsWindow.DrawText(80, 80, «»)
  13. significado = Dictionary.GetDefinition(Controls.GetTextBoxText(cuadroTexto))
  14. Controls.SetTextBoxText(multitxt, significado)
  15. Controls.ButtonClicked = MostrarSignificado
  16. Sub MostrarSignificado
  17. If Controls.GetButtonCaption(obtenerDef) = «Buscar» Then
  18. significado = Dictionary.GetDefinition(Controls.GetTextBoxText(cuadroTexto))
  19. Controls.SetTextBoxText(multitxt, significado)
  20. EndIf
  21. EndSub

¿Cuál es el mejor lenguaje de programación para aprender ?


Jiba
Por Jibba Jabba (Rick Murphy)  http://social.msdn.microsoft.com/Forums/en-US/smallbasic/thread/e22ddc96-a46c-4df6-a066-cef92f47ad30
• Después de hacer un poco de lectura parece una gran cantidad de docentes de todos los niveles, la escuela hasta la universidad / colegio, han observado que una de las preguntas más comunes que un estudiante pregunta es:
«¿Cuál es el mejor lenguaje de programación para aprender?»
Hasta ahora (como un novato para 4 meses) he aprendido una pregunta más útil preguntar sería? «¿Qué se necesita del lenguaje para hacerlo?»
Definir y clarificar su objetivo a continuación, seleccione un lenguaje diseñado para ese tipo de tarea. Lo más probable es ir a aprender varios lenguajes adecuados para diferentes propósitos (paradigmas) y cada uno se hará más fácil de aprender si su experiencia se basa. Practica + Experiencia.
Por ejemplo si desea codificar firmware para un nuevo televisor 3D o algo así, entonces podría elegir un lenguaje como C, ya que está cerca del hardware. Pero este tipo de lenguaje requiere mucha habilidad y experiencia previa para codificar
Así que si su objetivo es aprender a ser un buen programador y usted es nuevo en el maravilloso mundo de la programación o de regresar después de un periodo considerable, entonces es aconsejable seleccionar un lenguaje diseñado específicamente para esa tarea.
Small Basic es un lenguaje de alto nivel y de gran alcance considerablemente simplificado para ese propósito. Se simplifica y, en consecuencia hace que el programador pueda encontrar formas de hacer las cosas que de otra manera podrían ser una característica en otro lenguaje. Proporciona una buena base para las habilidades que usted necesita para ser un buen programador. Totalmente apto para todas las edades.
________________________________________
Debes tener un sueño para que puedas levantarse por la mañana. – Billy Wilder

How is Small Basic different from QBASIC and VB.Net?


a1

Small Basic   The Official Blog of Small Basic

http://blogs.msdn.com/b/smallbasic/archive/2013/05/21/how-is-small-basic-different-from-qbasic-and-vb-net.aspx


Ed Price – MSFT Microsoft MSFT

The answer comes from the creator of Small Basic, Vijaye Raji…

How is Small Basic different from QBASIC?

  • Unlike QBASIC, Small Basic is based on .Net and can consume (not produce) «Objects».
  • It supports distinct Operations, Properties and Events.
  • It doesn’t have GOSUB 🙂

How is it different from VB.Net?

Small Basic is small – much smaller than VB and supports just a subset of what VB.Net supports. Besides, you can actually write a compiler using VB.Net.

Got any other explanations as to how Small Basic is different from QBASIC and VB.NET? Is there anything else we should compare/contrast it to? Leave a comment with your answers!

Thanks!

– Ninja Ed

Small Basic: •Challenge of the Month – May 2013


challengemay


MS Small Basic: el objeto Controls (código)


controls1Hemos aprendido a usar diferentes objetos en Small Basic, como GraphicsWindow, Shapes, File y Math.

Usando el objeto Controls, puede insertar controles simples como cajas de texto y botones en la ventana de gráficos.

AddTextBox (agregar caja de texto): Agrega una caja de texto a la ventana de gráficos. Debe especificar las coordenadas X e Y de la caja de texto como parámetros.

AddButton (agregar botón):

Agrega un botón a la ventana de gráficos. Debe especificar el título del botón y sus coordenadas X e Y.

GetButtonCaption (obtener título del botón):
Obtiene el título de un botón. Debe especificar el nombre apropiado del botón como parámetro.

SetButtonCaption (establecer título del botón): Cambia el título de un botón. Debes especificar el nombre del botón y el nuevo título como parámetros.

GetTextBoxText (obtener texto de la caja de texto): Obtiene el texto presente en la caja de texto dando el nombre de la caja de texto como parámetro de esta operación.

SetTextBoxText (establecer texto de la caja de texto): Define el texto que aparece en la caja de texto. Debe especificar el nombre de la caja de texto y el texto requerido como parámetros.

Exploremos el objeto Controls con la ayuda de un ejemplo.

  1. GraphicsWindow.Title = «El      objeto Controls»
  2. GraphicsWindow.DrawText(50,      100, «Escriba su nombre:»)
  3. nombre =      Controls.AddTextBox(200, 100)
  4. GraphicsWindow.DrawText(50,      150, «Escriba su apellido:»)
  5. apellido =      Controls.AddTextBox(200, 150)
  6. botónMostrar =      Controls.AddButton(«Mostrar mensaje», 150, 200)
  7. mensaje =      Controls.AddMultiLineTextBox(50, 250)
  8. Controls.SetSize(mensaje, 310,      50)
  1. Controls.ButtonClicked =      MostrarMensaje
  1. Sub MostrarMensaje
  2. If      Controls.GetButtonCaption(botónMostrar) = «Mostrar mensaje»      Then
  3. Controls.SetTextBoxText(mensaje,»Hola      » + Controls.GetTextBoxText(nombre) + » » +      Controls.GetTextBoxText(apellido))
  4. EndIf
  5. EndSub

Small Basic Program Gallery


drawimage

Ed Price – MSFT  Microsoft  MSFT      El objetivo buscado, es que esta lista contiene ya una gran cantidad de pequeños programas básicos. Estamos buscando a los programas interactivos que son fáciles de usar, divertidos y tienen poca o ninguna curva de aprendizaje.

Para ver una mayor variedad de programas que se enumeran categóricamente, ver Small Gallery Program Basic – Listado por categoría. Las categorías incluyen juegos, gráfico, matemáticas, física, aplicaciones de productividad, Ciencias (Otros), sonido y texto.

http://blogs.msdn.com/b/smallbasic/archive/2012/10/12/small-basic-extensions-gallery.aspx

También deben volver recurrentemente, ya que la lista va  evolucionando con el tiempo, rápidamente.

Chomper (pack-man) – Small Basic Featured Game


avatar

Small Basic   The Official Blog of Small Basic

Chomper (Packman) – by Anthony Yarrell/QbasicLover

BFN681 (import code)  http://blogs.msdn.com/b/smallbasic/archive/2012/10/06/small-basic-program-gallery.aspx

http://social.msdn.microsoft.com/Forums/en-US/smallbasic/thread/c75994be-5ecd-4f72-83a5-39ce66ebadfb

MS Small Basic: overview of stack and matrix (code of Flight Reservation program)


reservavuelos

Of the Tutorial Small Basic Curriculum (3.2) , we take that :
An array (Array) can be multidimensional, but a stack (Stack object) has only one dimension. You can directly access any element of an array, but can only access the top element of the stack. That is, if you want to access the last element of the stack, you have to go through all the elements from the beginning.
An array is a variable type that can store multiple values ​​at once. If you want to store the names of five users, rather than to create 5 variables, you can use only one variable to store the five names
And remember that in Small Basic the Stack object  is used to store data as if it will stack plates. This object follows the principle: first in, first out

Let’s use the Array object, to write a program «Flight Reservation» (excellent example) that executes the following steps:

Reserve seating for 10 passengers.
 Display the name of each passenger and seat number
 Display the total number of seats available.
code:

  1. TextWindow.WriteLine(«Reservas de vuelos»)
  2. TotalAsientos = 10
  3. For i = 1 To TotalAsientos
  4.   TextWindow.Write(«Introduzca el nombre del pasajero: «)
  5.   nombre[i] = TextWindow.Read() 
  6.   TextWindow.WriteLine(«El número de asiento » + i + » está reservado para » + nombre[i])
  7.   ObtenerDetalles()
  8. EndFor
  9.  
  10. Sub ObtenerDetalles
  11.   If Array.GetItemCount(nombre) = TotalAsientos Then
  12.     TextWindow.WriteLine(«¡No hay más asientos disponibles!»)
  13.   Else
  14.     Array.GetItemCount(nombre)
  15.     AsientosDisponibles = TotalAsientos – Array.GetItemCount(nombre)   
  16.     TextWindow.WriteLine(«Número de asientos disponibles: «+ AsientosDisponibles)
  17.     TextWindow.WriteLine(«»)   
  18.   EndIf
  19. EndSub

Small Basic : operaciones del objeto Stack (código)


stack

El objeto Stack en Small Basic se usa para almacenar datos al igual que si apilara platos. Este objeto sigue el principio: primero en entrar, primero en salir.

Por ejemplo, si mira hacia abajo una pila de platos, sólo se ve el plato superior. Para ver el siguiente plato, tendrá que quitar el plato superior. No se puede tomar un plato de la mitad de la pila hasta que se hayan quitado todos los platos que tiene encima.

El objeto Stack tiene tres operaciones:

  • PushValue (empujar valor)
  • PopValue (quitar valor)
  • GetCount (obtener cuenta)

La operación PushValue es igual que agregar un nuevo plato encima de la pila de platos. Con la ayuda de esta operación, puede agregar un valor en la pila especificada

La operación PopValue es como recoger un plato de la parte superior de la pila. Use esta operación para obtener un valor de una pila especificada.

La operación GetCount proporciona el número total de platos en una pila. Use esta operación para determinar la cantidad de elementos en una pila específica.

La operación PushValue no devuelve nada.

La operación PopValue devuelve el valor de la pila.

La operación GetCount devuelve el número de elementos en una pila especificada.

En este ejemplo, se usa la operación PushValue operation para empujar 50 platos dentro de un contenedor vacío. Después, usando la operación PopValue, se toman 8 platos de la pila. Ahora, usamos la operación GetCount para obtener el número total de platos en el contenedor. Además muestra el valor del plato superior.

  1. TextWindow.Title = «Platos»
  2. contenedor =»vacío»
  3.  
  4. For i = 0 To 50
  5.   Stack.PushValue(contenedor , » plato número » + i)      
  6. EndFor
  7. TextWindow.WriteLine(«El número de platos en el contenedor es » + Stack.GetCount(contenedor))
  8.  
  9. For i = 0 To 8
  10.   Stack.PopValue(contenedor)       
  11. EndFor
  12.  
  13. TextWindow.WriteLine(«Después de tomar 8 platos, el número total de platos es » + Stack.GetCount(contenedor))
  14. TextWindow.WriteLine(«El plato superior en el contenedor es » + Stack.PopValue(contenedor))

Small Basic: operaciones del objeto Array (codigo)


array

¿ cómo podemos usar estas operaciones en un programa?

Asignaturas es una matriz que almacena los nombres de cinco diferentes asignaturas. Puede usar la operación IsArray para verificar si Asignaturas es una matriz. Asimismo, puedes usar la operación ContainsIndex para verificar la disponibilidad del índice Asignaturas[4] en el array Asignaturas. Al final puede usar la operación ContainsValue para ver si el valor “Matematica” está disponibile en el array Asignaturas.

  1. Asignaturas[1] = «Espanol»
  2. Asignaturas[2] = «Historia»
  3. Asignaturas[3] = «Informatica»
  4. Asignaturas[4] = «Ciencias»
  5. Asignaturas[5] = «Matematica» 
  6. TextWindow.WriteLine(» Asignaturas es una matriz:  » + Array.IsArray(Asignaturas))
  7. TextWindow.WriteLine(» Asignaturas esta disponible: » + Array.ContainsIndex(Asignaturas, 4))
  8. TextWindow.WriteLine(«Matematica esta disponible: » + Array.ContainsValue(Asignaturas, «Matematica»))
  9. Array.GetItemCount(Asignaturas)

Small Basic Wiki ( en español)


Modificado el 01/31/2012 12:42 por 80.254.75.12 categorizado como adam, IDE … • Acerca de Small Basic Small Basic es un proyecto que está destinado a traer de vuelta a la «diversión» a la programación. Al proporcionar un lenguaje de programación de pequeño y fácil de aprender en un entorno de desarrollo y acogedor, Small Basic hace que la programación de una brisa. Ideal para niños y adultos por igual, Small Basic ayuda a los principiantes a dar el primer paso en el maravilloso mundo de la programación.
• El  lenguaje Small Basic se inspira en el lenguaje de programación BASIC original, y se basa en la plataforma Microsoft Net.. Es muy pequeño, con sólo 15 palabras clave y utiliza conceptos mínimos para mantener la barrera de entrada lo más bajo posible.
• El entorno de Small Basic desarrollo es simple, pero ofrece potentes funciones ambientales modernas como Intellisense ™ y ayuda sensible al contexto inmediato.
• Small Basic permite a las bibliotecas de terceros para ser conectado con facilidad, por lo que es posible que la comunidad de extender la experiencia de maneras divertidas e interesantes.
Más Recursos
He aquí algunos ejemplos que ilustran las capacidades de Small Basic. Siéntase libre de añadir más a esta lista por favor.Turtle Plus Flickr • Blackboard • Flickr collage • Game of Life • JetLag • Snake
• Arrays • GameGraphics You can also find some sample here for the Fremy’s Extension for SmallBasic • FremyExtensionVer más

Welcome to Small Basic Wiki


http://wiki.smallbasic.com/addimage

The small Basic Language derives its inspiration from the original BASIC programming language, and is based on the Microsoft .Net platform. It is really small with just 15 keywords and uses minimal concepts to keep the barrier to entry as low as possible.

•The Small Basic development environment is simple, yet provides powerful modern environment features like Intellisense™ and instant context sensitive help.

•Small Basic allows third-party libraries to be plugged in with ease, making it possible for the community to extend the experience in fun and interesting ways.

More Resources

Here are some samples that illustrate the capabilities of Small Basic. Please feel free to add more to this list.


http://wiki.smallbasic.com/


Navigation


Quick Search
// »
Advanced Search »


// Edit

Print

RSS


Small Basic: Challenge of the Month – May 2013 (code)


numeros


Excellent program!.  Animation and sound
High level programming Nonki. congratulations

Program Listing VXK727 –  http://smallbasic.com/program/?VXK727

……………………………………………………………………………….

‘ 30-second Animation  Edited  ‘Nonki Takahashi
gw = GraphicsWindow.Width
gh = GraphicsWindow.Height
dx = gw / 6
dy = gh / 3
fs = 60
x0 = dx – fs / 2
y0 = dy – fs
GraphicsWindow.FontSize = fs
GraphicsWindow.BrushColor = «Orange»
t0 = Clock.ElapsedMilliseconds
For i = 1 To 10
obj[i] = Shapes.AddText(i)
x[i] = x0 + dx * Math.Remainder(i – 1, 5)
y[i] = y0 + dy * Math.Floor((i – 1) / 5)
Shapes.Move(obj[i], gw + fs, y[i])
EndFor
song1 = «O4C4C8C8C4C8C8E4G8G8E4C4D4D8D8D4D8D8O3B4O4D8D8O3B4G4»
song2 = «O4C4C8C8C4C8C8E4G8G8E4C4G4F4E4D4C1»
int = 770
Timer.Interval = int
f = 0
Timer.Tick = OnTick
Sound.PlayMusic(song1)
Sound.PlayMusic(song2)
Sound.PlayMusic(song1)
Sound.PlayMusic(song2)
Sub OnTick
t1 = Clock.ElapsedMilliseconds
f = f + 1
sec = Math.Floor((t1 – t0) / 1000)
GraphicsWindow.Title = sec + «[sec]»
MoveObj()
EndSub
Sub MoveObj
If f <= 3 Then ‘ 1, 2, 3
Shapes.Animate(obj[f], x[f], y[f], int)
ElseIf f = 4 Then
ElseIf f <= 7 Then ‘ 4, 5, 6
Shapes.Animate(obj[f – 1], x[f – 1], y[f – 1], int)
ElseIf f = 8 Then
ElseIf f <= 11 Then ‘ 7, 8, 9
Shapes.Animate(obj[f – 2], x[f – 2], y[f – 2], int)
ElseIf f = 12 Then
ElseIf f = 13 Then ‘ 10
Shapes.Animate(obj[f – 3], x[f – 3], y[f – 3], int)
ElseIf f <= 17 Then
ElseIf f <= 19 Then ‘ 10, 9
Shapes.Animate(obj[28 – f], -fs * 2, y[27 – f], int)
ElseIf f = 20 Then
ElseIf f <= 23 Then ‘ 8, 7, 6
Shapes.Animate(obj[29 – f], -fs * 2, y[29 – f], int)
ElseIf f = 24 Then
ElseIf f <= 27 Then ‘ 5, 4, 3
Shapes.Animate(obj[30 – f], -fs * 2, y[30 – f], int)
ElseIf f = 28 Then
ElseIf f = 29 Then ‘ 2
Shapes.Animate(obj[2], -fs * 2, y[2], int)
ElseIf f <= 37 Then
ElseIf f = 38 Then ‘ 1
Shapes.Animate(obj[1], -fs * 2, y[1], int)
Else
Timer.Pause()
GraphicsWindow.BrushColor = «DimGray»
GraphicsWindow.DrawText(gw / 2 – fs ,gh / 2 – fs, «End»)
EndIf
EndSub

‘ Copyright (c) Microsoft Corporation. All rights reserved.


MS Small Basic: files and directories (code)


file3

To learn programming, you must program, program and program.
I took several short exercises of the Curriculum and wrote these into a single program.
This exercise includes objects: ImageList; Network and File
Chapters 2.6 and 3.1 of the Curriculum Tutorial

  1. GraphicsWindow.Title = «Imagen»
  2. rutaImagen = «C:\Users\carlos\Pictures\conchilas.jpg»
  3. Imagen = ImageList.LoadImage(rutaImagen)
  4. GraphicsWindow.Width=ImageList.GetWidthOfImage(rutaImagen)
  5. GraphicsWindow.Height=ImageList.GetHeightOfImage(rutaImagen)
  6. GraphicsWindow.DrawImage(Imagen, 0, 0)
  7. ‘ Fin
  8.  
  9. rutaarchivo1= «http://download.microsoft.com/download/9/0/6/90616372-C4BF-4628-BC82-BD709635220D/Introducing%20Small%20Basic.pdf»
  10. ArchivoDescargado= Network.DownloadFile(rutaarchivo1)
  11. TextWindow.WriteLine(» Archivo descargado:   » + ArchivoDescargado)
  12. ‘ Fin
  13.  
  14. rutaarchivo2= «http://download.microsoft.com/»
  15. ContenidoPaginaWeb = Network.GetWebPageContents(rutaarchivo2)
  16. TextWindow.WriteLine(«Contenido de la pagina:  «)
  17. TextWindow.WriteLine(ContenidoPaginaWeb)
  18. ‘ Fin
  19.  
  20. TextWindow.WriteLine(» El objeto File  «)
  21. rutaarchivo3= «c:\Users\carlos\temp\SubdirectorioTemp\mio.txt»
  22. TextWindow.WriteLine(«Escribir Contenido» + File.WriteLine(rutaarchivo3, 1, «Boca es un gran equipo de futbol»))
  23. TextWindow.WriteLine(«Agregar contenido» + File.AppendContents(rutaarchivo3, » y ademas gano muchos trofeos»))
  24. TextWindow.WriteLine(«Leer contenido=  » + File.ReadContents(rutaarchivo3))
  25. ‘ Fin
  26.  
  27. As Nonki says, to learn programming, program and program.
    I took several short exercises of the Curriculum and wrote these into a single program.
    This exercise includes objects: ImageList; Network
    and File
    Chapters 2.6 and 3.1 of the Curriculum
    Keep in mind that the paths of the files and directories must be such as we have in our physician C:
    Perhaps someone more novice than me, this will serve.
    regards
  28.  
  29.  
  30. rutaArchivoOrigen = «c:\Users\carlos\temp\SubdirectorioTemp\mio.txt»
  31. rutaArchivoDestino = «C:\Users\carlos\temp\SubdirectorioTemp\mover.txt»
  32. rutaDirectorio= «C:\Users\carlos\temp\SubdirectorioTemp»
  33. TextWindow.WriteLine(«Copiar archivo de operacion: » +File.CopyFile(rutaArchivoOrigen,rutaArchivoDestino))
  34. TextWindow.WriteLine(» Archivos en el directorio:  » + File.GetFiles(rutaDirectorio))
  35. ‘ Fin
  36.  
  37. rutaDirectorio1 = «C:\Users\carlos\temp\Small Basic»
  38. TextWindow.WriteLine(«Crear directorio:  » + File.CreateDirectory(rutaDirectorio1))
  39. rutaDirectorio2 = «C:\Users\carlos\temp»
  40. TextWindow.WriteLine(«Directorios:  «+ File.GetDirectories(rutaDirectorio2))
  41. ‘ Fin
  42. TextWindow.WriteLine(» Ultimo error «)
  43. rutaarchivo4 = «c:\Users\carlos\temp\SubdirectorioTemp\mio.txt»
  44. TextWindow.WriteLine(» Operacion WriteLine: » + File.WriteLine(rutaarchivo4, 1, » como esta ? «))
  45. If File.LastError = » » Then
  46.   TextWindow.WriteLine(«La operacion se completo con exito»)
  47. Else
  48.   TextWindow.WriteLine(File.LastError)
  49. EndIf
  50. ‘Fin

Windows Forms for Small Basic v2 (Old thread)


extension


                              gungan37 – (IndyDev Software)

Hello guys! I have spent the past couple of days writing a new extension for Small Basic. Here is a screenshot of a program made with it:


  • The extension adds the following Windows Forms controls to Small Basic (** means that no other extension supports the control):

– Button

– RadioButton

– CheckBox

– ** Chart **

– Label

– ** LinkLabel **

– **NumericUpDown**

– **DateTimePicker**

– **MonthCalendar**

– ProgressBar

– TrackBar

– **RichTextBox**

– PictureBox

– **MaskedTextBox***

– **NotificationIcon***

– **ComboBox**

– **TreeView**

– **ListView**

Plus, it is 100% event driven! It is super easy to use! Just call WindowsFormsForSmallBasic.Setup() before you start and WindowsFormsForSmallBasic.InitializeForm() when all the controls are placed— this shows the form and hands off control to it. You may not modify the controls after this or write any more code outside of the event handlers. However, your event handlers can preform these operations.

Here is a sample (outdated, for v1): HMD046

And download link for the extension (outdated, for v1): http://www.mediafire.com/download.php?b8w679cqs6mpusr

Please ask any questions you make have and suggestions / bug reports are welcome too! I expect to add some more controls to the extension soon!


MS Small Basic: What are the Keywords of Small Basic?


Sin título2Examples:

If, Then, EndIf

If (Clock.Hour < 12) Then
TextWindow.WriteLine(«Good Morning World»)
EndIf

Else

We can shorten two if..then..endif statements to be just one by using a new word, else.

If we were to rewrite that program using else, this is how it will look:

If (Clock.Hour < 12) Then

TextWindow.WriteLine(«Good Morning World»)

Else TextWindow.WriteLine(«Good Evening World»)

EndIf

Goto

If (i < 25) Then

Goto start

EndIf

For, To, EndFor

For..EndFor is, in programming terms, called a loop.  It allows you to take a variable, give it an initial and an end value and let the computer increment the variable for you.  Every time the computer increments the variable, it runs the statements between For and EndFor.

This program prints out numbers from 1 to 24 in order:

For i = 1 To 24

TextWindow.WriteLine(i)

EndFor

Step

But if you wanted the variable to be incremented by 2 instead of 1 (like say, you wanted to print out all the odd numbers between 1 and 24), you can use the loop to do that too.

For i = 1 To 24 Step 2

TextWindow.WriteLine(i)

EndFor

While, EndWhile

The While loop is yet another looping method, that is useful especially when the loop count is not known ahead of time.  Whereas a For loop runs for a pre-defined number of times, the While loop runs until a given condition is true. In the example below, we’re halving a number until the result is greater than 1.

number = 100

While (number > 1)

TextWindow.WriteLine(number) number = number / 2

EndWhile

Sub, EndSub

A subroutine is a portion of code within a larger program that usually does something very specific, and that can be called from anywhere in the program.  Subroutines are identified by a name that follows the Sub keyword and are terminated by the EndSub keyword. Below is a program that includes the subroutine and calls it from various places.

PrintTime()

TextWindow.Write(«Enter your name: «)

name = TextWindow.Read()

TextWindow.Write(name + «, the time now is: «)

PrintTime()

Sub PrintTime

TextWindow.WriteLine(Clock.Time)

EndSub

And, ElseIf

If  percentage >= 75 Then

TextWindow.WriteLine(«The student’s grade is A.»)

  ElseIf  percentage < 75 And percentage >= 60  Then

TextWindow.WriteLine(«The student’s grade is B.»)

ElseIf  percentage < 60 And percentage >= 35 Then

TextWindow.WriteLine(«The student’s grade is C.»)

Else

TextWindow.WriteLine(«The student’s grade is D.»)

EndIf
Or

Sub subRainyCount

If Rainy = «y» Or Rainy = «Y» Then

RainyCount = RainyCount + 1

EndIf

EndSub

El objeto Network en MS Small Basic (código)


html

Se utiliza la operación GetWebPageContents (obtener contenido de la página web) del objeto Network para obtener el contenido de una página web indicada.

En este caso, la ventana de resultados muestra el código HTML (HyperText Markup Language) de la página web «https://empiezoinformatica.wordpress.com/».

  1. rutaArchivo = «https://empiezoinformatica.wordpress.com/»
  2. ContenidoPáginaWeb = Network.GetWebPageContents(rutaArchivo)
  3. TextWindow.Title =»Página web»
  4. TextWindow.WriteLine(«Contenido de la página:»)
  5. TextWindow.WriteLine(ContenidoPáginaWeb)

Small Basic: El objeto ImageList (código)


cocnhillas1

Veamos cómo se pueden utilizar las diversas operaciones del objeto ImageList

La altura y el ancho de la imagen se recuperan mediante el uso de las operaciones GetHeightOfImage (obtener altura de la imagen) y GetWidthOfImage (obtener ancho de la imagen).

Se cambia el tamaño de GraphicsWindow al mismo tamaño de la imagen.

Dibujamos la imagen cargada en la ventana de gráficos.

  1. GraphicsWindow.Title = «Imagen»
  2. rutaImagen = «C:\Users\carlos\Pictures\cocnhillas.jpg»
  3. Imagen = ImageList.LoadImage(rutaImagen)
  4. Ancho = ImageList.GetWidthOfImage(rutaImagen)
  5. Alto= ImageList.GetHeightOfImage(rutaImagen)
  6. GraphicsWindow.Width = Ancho
  7. GraphicsWindow.Height= Alto
  8. GraphicsWindow.DrawImage(Imagen, 0, 0)

Preguntas sobre MS Small Basic


microsoft_small_basic

¿Qué es Small Basic?

http://smallbasic.com/faq.aspx

Small Basic es un proyecto que se centra en la fabricación de programación accesible y fácil para los principiantes. Se compone de tres partes bien diferenciadas:
• El Idioma
• El entorno de programación
• Bibliotecas

El lenguaje se inspira en una variante temprana de BASIC, pero se basa en la moderna. Plataforma Net Framework. El medio ambiente es sencillo, pero rico en características, ofreciendo principiantes varios de los beneficios que los programadores profesionales han llegado a esperar de un IDE digna. Un amplio conjunto de bibliotecas ayudan a los principiantes a aprender escribiendo programas atractivos e interesantes.

Para quién es Small Basic ?

Small Basic está diseñado para principiantes que quieren aprender a programar. En nuestras pruebas internas que hemos tenido éxito con los niños entre las edades de 10 y 16. Sin embargo, no se limita sólo a los niños, incluso los adultos que tenían una inclinación a la programación han encontrado Small Basic muy útil para dar ese primer paso.

¿Por qué otro lenguaje Basic?

¿Por qué no? Según Wikipedia, hay más de 230 dialectos diferentes documentados de BASIC.

¿Cuál es el futuro de Small Basic?

El futuro de Small Basic depende de ustedes. Si la idea y el proyecto se reciben bien, vamos a seguir invirtiendo en el desarrollo de nuevas versiones y apoyando las características más solicitadas.

El veterano BASIC


basic1

En la programación de computadoras, el BASIC, siglas de Beginner’s All-purpose Symbolic Instruction Code[1] (Código simbólico de instrucciones de propósito general para principiantes en español), es una familia de lenguajes de programación de alto nivel.

BASIC está disponible para casi todas las plataformas y sistemas operativos existentes. Una implementación gratuita que cumple con estándares y es multiplataforma es Bywater BASIC (bwBASIC). El intérprete está escrito en C y viene bajo la licencia GNU. Está diseñado para interfaz de texto o consola (no gráfica), no incluye soporte para crear interfaces gráficas de usuario (GUI’s, Graphical User Interface). Hay un BASIC gratuito que si incluye soporte para GUI, es similar a Visual Basic y se ejecuta en Windows y GNU/Linux, es Phoenix Object BASIC.

Las versiones de intérpretes/compiladores más conocidos son la línea de productos Quick BASIC y QBASIC, éste último es sólo intérprete, ambos son de Microsoft. En la actualidad lo es el moderno Visual BASIC, que Microsoft ha tratado de mantener al menos mínimamente compatible con incluso las primeras versiones de sus BASIC (en realidad es escasamente compatible), si bien existe FreeBASIC que es un compilador libre, compatible en sintaxis con QBASIC/QuickBASIC.

Otras versiones comerciales incluyen PowerBASIC de PowerBASIC, PureBasic de Fantaisie Software, así como TrueBASIC de TrueBASIC, que cumple con los últimos estándares oficiales de BASIC. (True BASIC Inc. fue fundada por los creadores originales de Dartmouth BASIC.)

REALbasic es una variante disponible para Mac OS Classic, Mac OS X, Microsoft Windows y GNU/Linux, comercializada por los actuales propietarios de Rapid-Q, otra implementación inicialmente libre de BASIC actualmente abandonada. Una versión de un dialecto simple de BASIC para la parrot virtual machine, muestra cómo se implementa un intérprete de BASIC en un lenguaje similar al ensamblador. SmallBASIC es un dialecto que ejecuta en muchas plataformas (Win32, DOS, GNU/Linux y PalmOS) y viene bajo la licencia GNU (GPL).

Existen muchas implementaciones de BASIC freeware o GNU, como BCX, YaBasic, HBasic, XBasic, Gambas o Just BASIC, entre otras.

Ilustrativo juego en MS Small Basic (código)


mines

Microsoft Small Basic    Program Listing: FMN979-0 – by Nonki Takahashi

Challenge of the Month – May 2013

‘ Minesweeper for Small Basic 0.2
‘ Copyright (c) 2013 Nonki Takahashi. All rights reserved.

‘ History:
‘ 0.2 13/05/2013 Supported mouse right button. (FMN979-0)
‘ 0.1b 07/05/2013 Created. (FMN979)

GraphicsWindow.Title = «Minesweeper for Small Basic 0.2»
Init()
While «True»
Game()
playing = «True»
While playing
Program.Delay(500)
EndWhile
EndWhile
Sub Init
CRLF = Text.GetCharacter(13) + Text.GetCharacter(10)
nMines = 10
nCols = 9
nRows = 9
bgColor = «#949FB5»
cellColor = «#D6E3F3»
coverColor = «#4A64CF»
frameColor = «#222323»
markColor = «White»
flagColor = «Red»
color = «1=#414FBD;2=#206602;3=#AA0406;4=#020282;5=#790101;6=#06787F;7=#A70604;8=#AA0808;✸=Black;»
GraphicsWindow.BackgroundColor = bgColor
x0 = 31
y0 = 30
sizeX = 31
sizeY = 30
GraphicsWindow.Width = (nCols + 2) * sizeX
GraphicsWindow.Height = (nRows + 3) * sizeY
GraphicsWindow.BrushColor = «Black»
x = x0
y = y0 + (nRows + 0.5) * sizeY
GraphicsWindow.FontSize = sizeY
GraphicsWindow.DrawText(x, y – 0.12 * sizeY, «◯»)
GraphicsWindow.FontSize = sizeY * 0.8
GraphicsWindow.DrawText(x + 0.09 * sizeX, y + 0.02 * sizeY, «└»)
GraphicsWindow.FontSize = sizeY
x = x0 + (nCols – 1) * sizeX
GraphicsWindow.DrawText(x, y – 0.12 * sizeY, «✸»)
x = x0 + sizeX
GraphicsWindow.FontSize = sizeY * 0.6
oTime = Controls.AddTextBox(x, y)
Controls.SetSize(oTime, 2 * sizeX, sizeY)
x = x0 + (nCols – 3) * sizeX
oMines = Controls.AddTextBox(x, y)
GraphicsWindow.FontSize = sizeY
Controls.SetSize(oMines, 2 * sizeX, sizeY)
dirCol = «1=1;2=1;3=0;4=-1;5=-1;6=-1;7=0;8=1;»
dirRow = «1=0;2=-1;3=-1;4=-1;5=0;6=1;7=1;8=1;»
‘ The following line could be harmful and has been automatically commented.
‘ path = File.GetSettingsFilePath()
‘ The following line could be harmful and has been automatically commented.
‘ settings = File.ReadContents(path)
If settings[«nWins»] = «» Then
settings[«nWins»] = 0
EndIf
If settings[«nPlays»] = «» Then
settings[«nPlays»] = 0
EndIf
If settings[«record»] = «» Then
settings[«record»] = 999
EndIf
‘ The following line could be harmful and has been automatically commented.
‘ File.WriteContents(path, settings)
EndSub
Sub Game
time = 0
remain = nMines
covered = nCols * nRows
Controls.SetTextBoxText(oTime, time)
Controls.SetTextBoxText(oMines, remain)
CreateStage()
ShowStage()
waiting = «True»
Timer.Interval = 1000
Timer.Pause()
GraphicsWindow.MouseDown = OnMouseDown
EndSub
Sub OnMouseDown
GraphicsWindow.MouseDown = DoNothing
x = GraphicsWindow.MouseX
y = GraphicsWindow.MouseY
iCol = Math.Floor((x – x0) / sizeX) + 1
iRow = Math.Floor((y – y0) / sizeY) + 1
If cover[iCol][iRow] <> «» Then
If waiting Then
waiting = «False»
Timer.Tick = OnTick
Timer.Resume()
EndIf
If Mouse.IsLeftButtonDown Then
If toggle[iCol][iRow] <> 1 Then
OpenCover()
EndIf
Else
ToggleMark()
EndIf
EndIf
GraphicsWindow.MouseDown = OnMouseDown
EndSub
Sub DoNothing
OnMouseDown = «»
EndSub
Sub OnTick
time = time + 1
Controls.SetTextBoxText(oTime, time)
EndSub
Sub OpenCover
Shapes.Remove(question[iCol][iRow])
Shapes.Remove(flag[iCol][iRow])
Shapes.Remove(pole[iCol][iRow])
Shapes.Remove(cover[iCol][iRow])
cover[iCol][iRow] = «»
covered = covered – 1
If stage[iCol][iRow] = «» Then
If nMines < covered Then
checked = «»
OpenAdjacents()
EndIf
If nMines = covered Then
Win()
EndIf
ElseIf stage[iCol][iRow] = «✸» Then
Lose()
Else ‘ numbers
If covered = nMines Then
Win()
EndIf
EndIf
EndSub
Sub ToggleMark
toggle[iCol][iRow] = toggle[iCol][iRow] + 1
If toggle[iCol][iRow] = 3 Then
toggle[iCol][iRow] = 0
EndIf
If toggle[iCol][iRow] = 0 Then
Shapes.HideShape(question[iCol][iRow])
ElseIf toggle[iCol][iRow] = 1 Then
Shapes.ShowShape(flag[iCol][iRow])
Shapes.ShowShape(pole[iCol][iRow])
remain = remain – 1
Controls.SetTextBoxText(oMines, remain)
ElseIf toggle[iCol][iRow] = 2 Then
Shapes.HideShape(flag[iCol][iRow])
Shapes.HideShape(pole[iCol][iRow])
Shapes.ShowShape(question[iCol][iRow])
remain = remain + 1
Controls.SetTextBoxText(oMines, remain)
EndIf
EndSub
Sub Win
Timer.Pause()
If time < settings[«record»] Then
settings[«record»] = time
EndIf
settings[«nWins»] = settings[«nWins»] + 1
settings[«nPlays»] = settings[«nPlays»] + 1
‘ The following line could be harmful and has been automatically commented.
‘ File.WriteContents(path, settings)
SetMessage()
GraphicsWindow.ShowMessage(msg, «You win»)
time = 0
playing = «False»
EndSub
Sub Lose
Timer.Pause()
OpenMines()
settings[«nPlays»] = settings[«nPlays»] + 1
‘ The following line could be harmful and has been automatically commented.
‘ File.WriteContents(path, settings)
SetMessage()
GraphicsWindow.ShowMessage(msg, «You lose»)
time = 0
playing = «False»
EndSub
Sub SetMessage
msg = «Time: » + time + » sec» + CRLF
msg = msg + «High Score: » + settings[«record»] + » sec» + CRLF
msg = msg + «Game Play Times: » + settings[«nPlays»] + CRLF
msg = msg + «Wins: » + settings[«nWins»] + CRLF
msg = msg + «Rate: » + Math.Floor(settings[«nWins»] / settings[«nPlays»] * 100) + » %»
EndSub
Sub OpenAdjacents
‘ param iCol, iRow – space cell
checked[iCol][iRow] = «True»
For dir = 1 To 8
Stack.PushValue(«local», iCol)
Stack.PushValue(«local», iRow)
Stack.PushValue(«local», dir)
iCol = iCol + dirCol[dir]
iRow = iRow + dirRow[dir]
If (1 <= iCol) And (iCol <= nCols) And (1 <= iRow) And (iRow <= nRows) Then
If checked[iCol][iRow] = «» Then
If cover[iCol][iRow] <> «» And toggle[iCol][iRow] <> 1 Then
Shapes.Remove(question[iCol][iRow])
Shapes.Remove(flag[iCol][iRow])
Shapes.Remove(pole[iCol][iRow])
Shapes.Remove(cover[iCol][iRow])
cover[iCol][iRow] = «»
covered = covered – 1
EndIf
If stage[iCol][iRow] = «» Then
OpenAdjacents()
Else
checked[iCol][iRow] = «True»
EndIf
EndIf
EndIf
dir = Stack.PopValue(«local»)
iRow = Stack.PopValue(«local»)
iCol = Stack.PopValue(«local»)
EndFor
EndSub
Sub OpenMines
For iRow = 1 To nRows
For iCol = 1 To nCols
If stage[iCol][iRow] = «✸» Then
Shapes.HideShape(cover[iCol][iRow])
EndIf
EndFor
EndFor
EndSub
Sub CreateStage
stage = «»
toggle = «»
For iMine = 1 To nMines
iCol = Math.GetRandomNumber(nCols)
iRow = Math.GetRandomNumber(nRows)
While stage[iCol][iRow] = «✸»
iCol = Math.GetRandomNumber(nCols)
iRow = Math.GetRandomNumber(nRows)
EndWhile
stage[iCol][iRow] = «✸»
EndFor
For iRow = 1 To nRows
For iCol = 1 To nCols
AddNumbers()
EndFor
EndFor
EndSub
Sub AddNumbers
If stage[iCol][iRow] = «✸» Then
For dir = 1 To 8
jCol = iCol + dirCol[dir]
jRow = iRow + dirRow[dir]
If (1 <= jCol) And (jCol <= nCols) And (1 <= jRow) And (jRow <= nRows) And (stage[jCol][jRow] <> «✸») Then
stage[jCol][jRow] = stage[jCol][jRow] + 1
EndIf
EndFor
EndIf
EndSub
Sub ShowStage
GraphicsWindow.FontSize = sizeY
For iRow = 1 To nRows
For iCol = 1 To nCols
x = x0 + (iCol – 1) * sizeX
y = y0 + (iRow – 1) * sizeY
ShowCover()
ShowCell()
EndFor
EndFor
EndSub
Sub ShowCover
‘ param iCol, iRow – to show
‘ param x, y – left top coordinate
If cover[iCol][iRow] = «» Then
GraphicsWindow.BrushColor = coverColor
GraphicsWindow.PenWidth = 2
GraphicsWindow.PenColor = frameColor
cover[iCol][iRow] = Shapes.AddRectangle(sizeX, sizeY)
Shapes.HideShape(cover[iCol][iRow])
Shapes.Move(cover[iCol][iRow], x, y)
GraphicsWindow.BrushColor = flagColor
GraphicsWindow.PenWidth = 0
flag[iCol][iRow] = Shapes.AddTriangle(0, 0.2 * sizeY, 0.6 * sizeX, 0, 0.6 * sizeX, 0.4 * sizeY)
Shapes.HideShape(flag[iCol][iRow])
Shapes.Move(flag[iCol][iRow], x + 0.2 * sizeX, y + 0.2 * sizeY)
GraphicsWindow.BrushColor = markColor
pole[iCol][iRow] = Shapes.AddRectangle(0.1 * sizeX, 0.6 * sizeY)
Shapes.HideShape(pole[iCol][iRow])
Shapes.Move(pole[iCol][iRow], x + 0.7 * sizeX, y + 0.2 * sizeY)
question[iCol][iRow] = Shapes.AddText(«?»)
Shapes.HideShape(question[iCol][iRow])
Shapes.Move(question[iCol][iRow], x + 0.2 * sizeX, y – 0.12 * sizeY)
Else
Shapes.HideShape(flag[iCol][iRow])
Shapes.HideShape(pole[iCol][iRow])
Shapes.HideShape(question[iCol][iRow])
EndIf
Shapes.ShowShape(cover[iCol][iRow])
EndSub
Sub ShowCell
‘ param iCol, iRow – to show
‘ param x, y – left top coordinate
GraphicsWindow.BrushColor = cellColor
GraphicsWindow.FillRectangle(x, y, sizeX, sizeY)
GraphicsWindow.PenWidth = 2
GraphicsWindow.PenColor = frameColor
GraphicsWindow.DrawRectangle(x, y, sizeX, sizeY)
GraphicsWindow.BrushColor = color[stage[iCol][iRow]]
If stage[iCol][iRow] = «✸» Then
dx = 0
Else
dx = 0.2 * sizeX
EndIf
GraphicsWindow.DrawText(x + dx, y – 0.12 * sizeY, stage[iCol][iRow])
EndSub

‘ C opyright (c) Microsoft Corporation. All rights reserved.

Small Basic: Propiedades y operaciones del objeto File


directorios

Usar propiedades del objeto File.

  • LastError

Usar operaciones del objeto File.

  • CreateDirectory
  • GetDirectories (obtener directorios)

Cree un directorio de acuerdo con un nombre introducido por el usuario.

Descargue un archivo de la red y lo copie en el directorio que ha creado.

Muestre el contenido del archivo descargado en la ventana de texto.

Acepte contenido adicional del usuario y agregue ese contenido al archivo.

Muestre el contenido final del archivo en la ventana de texto.


Nota: El archivo tiene que existir en la ruta de red especificada para que la solución funcione.


Solución:

TextWindow.Write(«Escriba el nombre del nuevo directorio: «)

NombreDirectorio = TextWindow.Read()

File.CreateDirectory(NombreDirectorio)

rutaarchivo = «\\mum-9785sm\Compartido\ArchivoEntradaSalidaO.txt»

rutadescarga = Network.DownloadFile(rutaarchivo)

If File.CopyFile(rutadescarga, NombreDirectorio) = «SUCCESS» Then

TextWindow.WriteLine(«El archivo ha sido descargado de la red y copiado a: » + NombreDirectorio )

archivos= File.GetFiles(NombreDirectorio)

TextWindow.WriteLine(«Este es el contenido del archivo: «)

TextWindow.WriteLine(File.ReadContents(archivos[1]))

TextWindow.Write(«Escriba los datos para agregarlos en el archivo: «)

DatosAgregados = TextWindow.Read()

File.AppendContents(archivos[1],» » + DatosAgregados)

TextWindow.WriteLine(«El contenido del archivo después de agregar los datos es como sigue: «)

TextWindow.WriteLine(File.ReadContents(archivos[1]))

EndIf

Small Basic: Intermediate Challenge 1 (Sushi restaurant)


sushiNao

Program Listing:    JWF370    http://social.msdn.microsoft.com/Forums/en-US/smallbasic/thread/bce001cb-ce65-4d23-8645-466098928115/

Intermediate Challenge 1

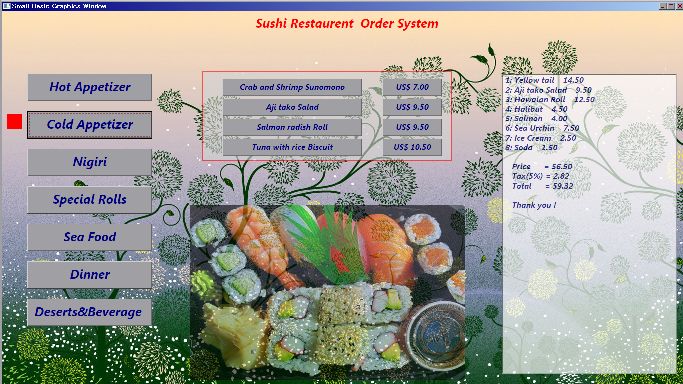
Write a program to display a menu that a till operator might use in a restaurant.  They click on the items the customer wants and it works out the bill.

………………………………………………………………………………………………………………………….

Code:

‘  Challenge of the month  May 2013     Restaurant  menu order   by  NaochanON


InitData()

GUI()

Controls.ButtonClicked=EnterData

Sub EnterData

btnnmb=Controls.LastClickedButton

nm=controls.GetButtonCaption(btnnmb)

if text.IsSubText(Btns,nm) Then  ‘

DNMB= Text.GetSubTextToEnd(btnnmb,7)                     ‘

Newconts= Menu[DNMB]

NewPrice= Price[DNMB]

DataEnter()

elseif  text.IsSubText(Newconts,nm) then

searchNo()

NN=NN+1

Order=order+NN+»: «+nm+»    «+Price[DNMB][PNMB]+CRLF

TotPrice=TotPrice+Price[DNMB][PNMB]

Mes=Order+CRLF+»   Price      = «+Totprice+CRLF

tax=math.floor(5*Totprice)/100

Mes=Mes+»   Tax(5%) = «+tax+CRLF

Mes=Mes+»   Total      = «+(Totprice+tax)+CRLF+CRLF+»   Thank you !»

Controls.SetTextBoxText(receipt,Mes)

EndIf

endsub

sub searchNo

For j=1 To Array.GetItemCount(Newconts)

If nm= Newconts[j] Then

PNMB=j

j=Array.GetItemCount(Newconts)

endif

EndFor

EndSub

Sub DataEnter

If NMB2<>0 Then

For j=1 To NMB2

Controls.HideControl(btn2[j])                  ‘

Controls.HideControl(btn3[j])

EndFor

EndIf

Shapes.Move(redrect,10,130+75*(DNMB-1))                            ‘  Red mark

‘————————————————————————————————————————-

NMB=Array.GetItemCount(Newconts)

GRXY=»W=500;H=»+(NMB*45)

GrayBox()

‘————————————————————————————————————————-

GraphicsWindow.BrushColor=»Navy»

For i=1 To NMB

btn2[i]=Controls.AddButton(Newconts[i],440,135+40*(i-1))         ‘  menu

btn3[i]=Controls.AddButton(«US$ «+NewPrice[i],760,135+40*(i-1))  ‘  price

Controls.SetSize(btn2[i],280,35)

Controls.SetSize(btn3[i],120,35)

EndFor

‘————————————————————————————————————————-

NMB2=NMB                                               ‘

endsub

Sub GrayBox

Shapes.Remove(GRBOX)

GraphicsWindow.BrushColor=»Lightgray»

GRBOX=Shapes.AddRectangle(GRXY[«W»],GRXY[«H»])           ‘  gray  box

Shapes.Move(GRBOX,400,120)

Shapes.SetOpacity(GRBOX,60)

EndSub

Sub GUI

GraphicsWindow.Width=Desktop.Width

GraphicsWindow.Height=Desktop.Height

GraphicsWindow.Top=0

GraphicsWindow.Left=0

GraphicsWindow.FontName=»Gergia»

GraphicsWindow.FontItalic=»true»

GraphicsWindow.DrawImage(back,0,0)                       ‘  background image

‘————————————————————————————————————————-

photo=Shapes.AddImage(Img)                               ‘  Sushi photo

Shapes.Zoom(photo,550/imgw,350/imgh)

Shapes.Move(photo,400,380)

Shapes.SetOpacity(photo,60)

‘————————————————————————————————————————-

GraphicsWindow.penColor=»Red»

GraphicsWindow.BrushColor=»Red»

redrect= Shapes.AddRectangle(30,30)

Shapes.Move(redrect,10,-100)

GraphicsWindow.FontSize=25

TTL=Shapes.AddText(» Sushi Restaurent  Order System  «)  ‘  Title

Shapes.Move(TTL,500,10)

‘————————————————————————————————————————-

GraphicsWindow.FontSize=25

GraphicsWindow.BrushColor=»Navy»

For i=1 To array.GetItemCount(Btns)

btn[i]= Controls.AddButton(Btns[i],50,125+75*(i-1))    ‘   Menu

Controls.SetSize(btn[i],250,55)

EndFor

‘————————————————————————————————————————-

GraphicsWindow.FontSize=16

receipt=Controls.AddMultiLineTextBox(1000,125)           ‘   receipt box

Controls.SetSize(receipt,350,600)

Shapes.SetOpacity(receipt,70)

EndSub

Sub InitData

back=ImageList.LoadImage(«C:\Windows\Web\Wallpaper\Scenes\img29.jpg»)

url= «http://farm7.static.flickr.com/6109/6245861119_1f06dabea8.jpg»

‘url=Flickr.GetRandomPicture(«Sushi»)

img= imagelist.LoadImage(url)

imgw= ImageList.GetWidthOfImage(img)

imgh= ImageList.GetHeightOfImage(img)

Btns=»1=Hot Appetizer;2=Cold Appetizer;3=Nigiri;4=Special Rolls;5=Sea Food;6=Dinner;7=Deserts&Beverage »

‘————————————————————————————————————————-

Menu[1]=»1=Japanese Eggplant;2=Tempura;3=Softshell Crab;4=Crab Cake;5=Oyster Saute»

Menu[2]=»1=Crab and Shrimp Sunomono;2=Aji tako Salad;3=Salmon radish Roll;4=Tuna with rice Biscuit»

Menu[3]=»1=Crab;2=Eel Sea;3=Halibut;4=Mackerel;5=Octopus;6=Omelet;7=Salmon;8=Salmon Roe;9=Scallop;10=Sea Urchin;11=Squid;12=Tuna»

Menu[4]=»1=Alaskan Roll;2=Hawaian Roll;3=Mexican Roll;4=Eel Roll;5=Avocado Roll»

Menu[5]=»1=Salmon;2=Scallops;3=Sea Bass;4=Tuna;5=Monk Fish;6=Black Cod;7=Yellow tail»

Menu[6]=»1=Chicken Teriyaki;2=Assorted Tempura;3=Sushi Deluxe;4=Assorted Sashimi Plate;5=Chirashi Sushi»

Menu[7]=»1=Ice Cream;2=Soda;3=Cola;4=Hot Tea;5=Cold Tea»

‘————————————————————————————————————————-

Price[1]=»1=7.00;2=7.00;3=8.50;4=9.50;5=7.00″

Price[2]=»1=7.00;2=9.50;3=9.50;4=10.50″

Price[3]=»1=3.50;2=5.00;3=4.50;4=3.50;5=4.00;6=3.00;7=4.00;8=5.00;9=4.50;10=7.50;11=3.75;12=4.50″

Price[4]=»1=12.00;2=12.50;3=11.50;4=10.50;5=7.50″

Price[5]=»1=12.00;2=14.00;3=16.50;4=15.50;5=13.00;6=13.50;7=14.50″

Price[6]=»1=12.00;2=13.00;3=22.00;4=24.50;5=22.50″

Price[7]=»1=2.50;2=1.50;3=1.50;4=2.00;5=1.50″

CRLF= Text.GetCharacter(13)+Text.GetCharacter(10)

EndSub

Small Basic: operaciones del objeto File (codigo)


File2

Simplicidad en el manejo de Archivos y Directorios. Veamos cómo podemos usar estas operaciones…
Como ve, primero se usa la operación CreateDirectory para crear un directorio.
Luego se usa la operación GetDirectories para conseguir la ruta de todos los directorios presentes en el destino especificado.
 
 
  1. TextWindow.Title = «El objeto File «
  2. rutaDirectorio1 =  «C:\Users\carlos\temp\Small Basic»
  3. TextWindow.WriteLine(» Crear directorio:  » + File.CreateDirectory(rutaDirectorio1))
  4. rutaDirectorio2 = «C:\Users\carlos\temp»
  5. TextWindow.WriteLine(» Directorios: » + File.GetDirectories(rutaDirectorio2))
 

Small Basic: entrada y salida con el objeto File (código)


file1

Con la ayuda del objeto File (archivo) en Small Basic, puede acceder a información de un archivo almacenado en el equipo. Además puede leer y escribir información desde y hacia el archivo.

El objeto File incluye varias operaciones y propiedades, tales como:

CreateDirectory          : Crear Directorio

AppendContents        : Agregar Contenidos

GetFiles                      : Obtener Archivos

GetDirectories            : Obtener Directorios

ReadContents : Leer Contenidos

LastError                    : Último Error

WriteLine                   : Escribir Línea

CopyFile                     : Copiar Archivo

DeleteDirectory          : Eliminar Directorio

Escribamos un programa para entender mejor estas operaciones:

  1. TextWindow.Title      = «El objeto File»
  2. rutaDirectorio1      = «C:\Users\carlos\temp\Small Basic»
  3. TextWindow.WriteLine(«Crear      directorio: «+ File.CreateDirectory(rutadirectorio1))
  4. rutadirectorio2      = «C:\Users\carlos\temp»
  5. TextWindow.WriteLine(«Directorios:      » + File.GetDirectories(rutaDirectorio2))

Small Basic: picture of the earth and the moon (código). Scaled distances


earth

Nonki Takahashi  This is my sample of community suggestion 1 (2) Draw a picture of the earth and the moon. (with scaled distances)

http://social.msdn.microsoft.com/Forums/en-US/smallbasic/thread/bce001cb-ce65-4d23-8645-466098928115/

……………………………………………………………………………………………………………

re = 6378 ‘ equatorial radius of the earth [km]

rm = 1738 ‘ equatorial radius of the moon [km]

ro = 834400 ‘ radius of the orbit of the moon [km]

km = 1 / rm ‘ [px/km]

GraphicsWindow.BackgroundColor = «Black»

‘ draw the earth

GraphicsWindow.BrushColor = «Blue»

x = 40

y = 200

r = re * km

GraphicsWindow.FillEllipse(x – r, y – r, 2 * r, 2 * r)

GraphicsWindow.BrushColor = «Gray»

GraphicsWindow.DrawText(x – r, y + 10, «the earth»)

‘ draw the moon

GraphicsWindow.BrushColor = «Silver»

x = x + ro * km

r = rm * km

GraphicsWindow.FillEllipse(x – r, y – r, 2 * r, 2 * r)

GraphicsWindow.BrushColor = «Gray»

GraphicsWindow.DrawText(x – r, y + 10, «the moon»)

Resolver ecuaciones cuadráticas. ax ² + bx + c = 0 (código Small. Basic)


cuadrática1

Small Basic   by Sam Christy

………………………………………………………………………………………………………………………………………………………………………………………………………………………………………………………………………………………………………………………………………..

TextWindow.Title=»Quadratic Equation Solver© – Brought to you by Sam Christy»

TextWindow.BackgroundColor = «Yellow»

TextWindow.ForegroundColor=»Black »

TextWindow.WriteLine(«ax² + bx + c = 0»)

start:

TextWindow.WriteLine(«»)

TextWindow.Write(«a: «)

a=TextWindow.ReadNumber()

If a = 0 Then

TextWindow.WriteLine(«»)

TextWindow.WriteLine(«ERROR: Equation invalid, a = «+a+», a cannot = 0.»)

TextWindow.WriteLine(«Please try again…»)

TextWindow.PauseWithoutMessage()

Goto start

EndIf

TextWindow.Write(«b: «)

b=TextWindow.ReadNumber()

TextWindow.Write(«c: «)

c=TextWindow.ReadNumber()

TextWindow.WriteLine(«»)

TextWindow.WriteLine(«Equation: «+a+»x² + «+b+»x + «+c+» = 0″)

TextWindow.WriteLine(«»)

delta=Math.Power(b,2)-4*a*c

If delta < 0 Then

TextWindow.WriteLine(«ERROR: Equation invalid, Delta (b² – 4ac) = «+delta+», Delta cannot be less than 0.»)

TextWindow.WriteLine(«Please try again…»)

TextWindow.PauseWithoutMessage()

Goto start

Else

If delta = 0 Then

solution1 =(-b+Math.SquareRoot(Math.Power(b,2)-4*a*c))/(2*a)

TextWindow.WriteLine(«x: » + solution1)

Else

solution1 =(-b+Math.SquareRoot(Math.Power(b,2)-4*a*c))/(2*a)

solution2 =(-b-Math.SquareRoot(Math.Power(b,2)-4*a*C))/(2*a)

TextWindow.WriteLine(«x: » + solution1)

TextWindow.WriteLine(«x: » + solution2)

EndIf

EndIf

TextWindow.WriteLine(«»)

TextWindow.WriteLine(«Would you like to perform another calculation? (Y or N)»)

answer=TextWindow.Read()

If answer = «Y» Or answer = «y» Then

Goto start

Else

TextWindow.Clear()

TextWindow.WriteLine(«I hope you have enjoyed using my program!»)

TextWindow.WriteLine(«©Copyright Sam Christy 2010»)

TextWindow.WriteLine(«»)

TextWindow.WriteLine(«Simply press any key to exit…»)

TextWindow.PauseWithoutMessage()

Program.End()

EndIf

Small Basic: Triángulos y punto medio de una recta (código)


pendiente

Trazado de triángulos con base en la recta que pasa (corta) a otra recta por su punto medio

código:

  1. ‘ x1 < o > x2
  2. TextWindow.WriteLine(«Input      x1»)
  3. x1 = TextWindow.ReadNumber()
  4. TextWindow.WriteLine(«Input      y1»)
  5. y1 = TextWindow.ReadNumber()
  6. TextWindow.WriteLine(«Input      x2»)
  7. x2 = TextWindow.ReadNumber()
  8. TextWindow.WriteLine(«Input      y2»)
  9. y2 = TextWindow.ReadNumber()
  10. ‘ m is the slope of the line
  11. m =      (y2-y1) / (x2-x1)
  12. x =      (x1 + x2)/2
  13. y=      (y1 + y2)/2
  14. TextWindow.WriteLine(«the      slope of the line is :  » + m)
  15. GraphicsWindow.PenWidth = 1
  16. GraphicsWindow.PenColor =      «Red»
  17. GraphicsWindow.DrawLine(x1, y1,      x2, y2)
  18. GraphicsWindow.PenWidth= 1
  19. GraphicsWindow.PenColor=      «Blue)
  20. GraphicsWindow.DrawEllipse(x1,y1,      10,10)
  21. GraphicsWindow.DrawEllipse(x2,y2,      10,10)
  22. GraphicsWindow.PenWidth = 1
  23. GraphicsWindow.PenColor =      «Red»
  24. GraphicsWindow.DrawBoundText(x,      y,20, » medio «)
  25. GraphicsWindow.DrawLine(x, y, x      + 200, y)
  26. GraphicsWindow.DrawLine(x, y, x      – 200, y)
  27. GraphicsWindow.PenColor =      «Cyan»
  28. GraphicsWindow.DrawLine(x +      200, y, x1, y1)
  29. GraphicsWindow.DrawLine(x –      200, y, x1, y1)
  30. GraphicsWindow.DrawLine(x +      200, y, x2, y2)
  31. GraphicsWindow.DrawLine(x –      200, y, x2, y2)
  32. ‘ slope = m = (y2 – y1) / (x2 –      x1) = elevation / traveled.  for x1      different from  x2
  33. tangent      = y2-y1 / x2-x1
  34. ‘      distance = d
  35. a= Math.Power(x2- x1, 2)
  36. b =      Math.Power(y2-y1, 2)
  37. c = a + b
  38. d = Math.SquareRoot(c)
  39. TextWindow.WriteLine(«the      distance is : «

Small Basic: cálculo del punto medio de una recta, dadas sus coordenas


pmedio1

Escribir un programa en Small Basic, que calcule el punto medio de cualquier recta, dadas sus coordenas. La manera de obtener geométricamente el punto medio de una recta es Dado un segmento, cuyos extremos tienen por coordenadas:
(x1, y1) , (x2, y2) … el punto medio tendrá por coordenadas
.                           (x, y) = ( x1+x2)/ 2 , (y1+y2) / 2 )


TextWindow.WriteLine(«INPUT x1»)
x1= TextWindow.ReadNumber()
TextWindow.WriteLine(«INPUT y1»)
y1= TextWindow.ReadNumber()
TextWindow.WriteLine(«INPUT x2»)
x2= TextWindow.ReadNumber()
TextWindow.WriteLine(«INPUT y2»)
y2= TextWindow.ReadNumber()
x = (x1 + x2)/2
y= (y1 + y2)/2
TextWindow.WriteLine(«x =  » + x + »   y = » + y)
GraphicsWindow.Width = 240
GraphicsWindow.Height = 240
GraphicsWindow.PenColor = «Blue»
GraphicsWindow.DrawLine(x1, y1, x2, y2)
GraphicsWindow.PenWidth = 10
GraphicsWindow.PenColor = «Red»
GraphicsWindow.DrawEllipse(x, y, 20, 20)

Visual Basic: Area de un triángulo (código)


areatri1

Se pide ingresar la base y altura de un triángulo, y el programa calcula el área y lo grafica.  Graduado (convertido)  del programa en  Small Basic  WGZ319   Editado por  Nonki Takahashi

  1. Module areatriModule
  2. Dim base, height, area, cm, size, x, y, k, pxBase, pxHeight, x1, y1, x2, y2, x3, y3, triangle As Primitive
  3. Sub Main()
    1. ‘Area of a triangle
    2. TextWindow.Write(«enter the value of the base of the triangle: «)
    3. base = TextWindow.ReadNumber()
    4. TextWindow.Write(«enter the value of the height of the triangle: «)
    5. height = TextWindow.ReadNumber()
    6. area = (base * height) / 2
    7. TextWindow.WriteLine(«The area is » + Area)
  4. cm = 24 ‘ [px/cm]
  5. size = 12 ‘ [cm]
  6. GraphicsWindow.Width = cm * size
  7. GraphicsWindow.Height = cm * size
  8. GraphicsWindow.Top = TextWindow.Top + 150
  9. GraphicsWindow.Left = TextWindow.Left + 50
  10. GraphicsWindow.BackgroundColor = «LightGray»
  11. DrawGrid()
  12. DrawTriangle()
  13. End Sub
  14. Sub DrawGrid()
    1. GraphicsWindow.PenColor = «DimGray»
    2. For x = 0 To cm * size Step cm

i.   GraphicsWindow.DrawLine(x, 0, x, cm * size)

  1. Next
  2. For y = 0 To cm * size Step cm

i.   GraphicsWindow.DrawLine(0, y, cm * size, y)

  1. Next
  2. End Sub
  3. Sub DrawTriangle()
    1. GraphicsWindow.PenColor = «Black»
    2. GraphicsWindow.BrushColor = «MediumSeaGreen»
    3. k = 0.3 ‘ 0 <= k <= 1
    4. pxBase = base * cm
    5. pxHeight = height * cm
    6. x1 = pxBase * k
    7. y1 = 0
    8. x2 = pxBase
    9. y2 = pxHeight
    10. x3 = 0
    11. y3 = y2
    12. triangle = Shapes.AddTriangle(x1, y1, x2, y2, x3, y3)
    13. Shapes.Move(triangle, cm, cm)
    14. End Sub
    15. End Module

Small Basic: Area de un triángulo (código)


areatri

Se pide ingresar la base y altura de un triángulo, y el programa calcula el área y lo grafica.  Edited by Nonki Takahashi

  1. ‘  Program Listing WGZ319
  1. ‘Area of a triangle
  2. TextWindow.Write(«enter the value of the base of the triangle: «)
  3. base = TextWindow.ReadNumber()
  4. TextWindow.Write(«enter the value of the height of the triangle: «)
  5. height = TextWindow.ReadNumber()
  6. area = (base * height) / 2
  7. TextWindow.WriteLine(«The area is » + Area)
  1. cm = 24 ‘ [px/cm]
  2. size = 12 ‘ [cm]
  3. GraphicsWindow.Width = cm * size
  4. GraphicsWindow.Height = cm * size
  5. GraphicsWindow.Top = TextWindow.Top + 150
  6. GraphicsWindow.Left = TextWindow.Left + 50
  7. GraphicsWindow.BackgroundColor = «LightGray»
  8. DrawGrid()
  9. DrawTriangle()
  1. Sub DrawGrid
  2. GraphicsWindow.PenColor = «DimGray»
  3. For x = 0 To cm * size Step cm
  4. GraphicsWindow.DrawLine(x, 0, x, cm * size)
  5. EndFor
  6. For y = 0 To cm * size Step cm
  7. GraphicsWindow.DrawLine(0, y, cm * size, y)
  8. EndFor
  9. EndSub
  1. Sub DrawTriangle
  2. GraphicsWindow.PenColor = «Black»
  3. GraphicsWindow.BrushColor = «MediumSeaGreen»
  4. k = 0.3 ‘ 0 <= k <= 1
  5. pxBase = base * cm
  6. pxHeight = height * cm
  7. x1 = pxBase * k
  8. y1 = 0
  9. x2 = pxBase
  10. y2 = pxHeight
  11. x3 = 0
  12. y3 = y2
  13. triangle = Shapes.AddTriangle(x1, y1, x2, y2, x3, y3)
  14. Shapes.Move(triangle, cm, cm)
  15. EndSub

Small basic and tablet compatibility


tablet

know if the small basic is compatible tablets equipped with windows 7 or 8.

Windows 7 tablets: run Small Basic fine on the desktop / with Silverlight

Windows 8 tablets (except ARM): run Small Basic fine on the desktop / with Silverlight

Windows 8 ARM tablets: do not run Small Basic at all (even with Silverlight)

Edited by gungan37

Proposed As Answer by litdevMicrosoft Community Contributor

Marked As Answer by Ed Price – MSFTMicrosoft Employee

http://social.msdn.microsoft.com/Forums/en-US/smallbasic/thread/cfdb6219-ea5b-4722-82b7-729888074993

Otros recursos adicionales en Small Basic


examplesb
Si desea avanzar a la programación en C # o VB.NET sin dejar de utilizar sus habilidades de SB estos tutoriales le muestran cómo.

by NaochanON Wednesday Editado, 27 de febrero 2013 07:58
Hice 2 manuales y 2 listas de programas de ejemplo (continuación).
1) Para los usuarios japoneses. Manual Japonés (日本语) * corregida ver1.01
https://docs.google.com/file/d/0B8mzGh2PVjd-RnRQZHdYRE42THc/edit
2) Para el resto de los usuarios. Inglés Manual * corregida ver1.01
https://docs.google.com/file/d/0B8mzGh2PVjd-bjlxVjVnV3lsNlE/edit
3) programas de ejemplo (hecho por NaochanON)
https://docs.google.com/file/d/0B8mzGh2PVjd-eTlYSDNBX1lXd2s/edit
La extensión no se utiliza en los programas escritos en el manual básicamente.
La próxima vez voy a crear ejemplo con la extensión.
4) los programas publicados en este tema «Pon su código fuente de ejemplo aquí y rasgos de nuestros blogs!»

https://docs.google.com/file/d/0B8mzGh2PVjd-UEd2S3NWUWFvV2c/edit
Espero que estos manuales ayuden a su programación.

gracias.

http://social.msdn.microsoft.com/Forums/en-US/smallbasic/thread/8b995743-071a-4eb0-abe3-2d05de90c018

La ecuación de la línea recta que muestra los ejes X e Y


easy

Pregunta:   Después de resolver la ecuación y = ax + b, ¿cómo puede Gráficor una línea recta en los ejes X e Y como Excel? – carlosfmur1948

Respuesta:   Tienes que dibujar cada segmento de línea y los ejes y etiquetado etc usando GraphicsWindow.DrawLine, y dando las coordenadas en píxeles – esto puede requerir un poco de conversión. Es necesario para calcular las coordenadas de los dos extremos del segmento de línea que se está dibujando, usando la ecuación o cualquier otro método es el adecuado.
Casualmente, yo estaba pensando en escribir una extensión de trazado simple en lugar de vertimiento datos a Excel a través de un archivo de texto que es lo que tengo que hacer si quiero una parcela de SmallBASIC.
Easy Graph  por NaoChanON

http://social.msdn.microsoft.com/Forums/en-US/smallbasic/thread/4f6b079a-c2c2-41f2-b38d-85ebcf9981ef/

Empezando con Small Basic


a2

Microsoft Small Basic pone la diversión en la programación de computadoras. Con un entorno de desarrollo que es muy fácil de dominar, que facilita a los estudiantes de todas las edades en el mundo de la programación

Lea el FAQ Small Basic

Descarga Small Basic

Utilice la Guía de inicio para comenzar a aprender Small Basic

Utilice el programa de estudios para ampliar su conocimiento

Lea los capítulos de muestra de libros electrónicos a bucear profundamente en Small Basic

Hacer preguntas en los foros

Manténgase informado acerca de Small Basic leyendo nuestro blog

http://social.technet.microsoft.com/wiki/contents/articles/15889.get-started-with-small-basic.aspx

El objeto Flickr en Small Basic (código)


a2

Un ejercicio agradable
Con el objeto de Flickr obtenemos imágenes aleatorias.
Cambian 10 veces las imágenes con un delay = 200 msegundos
Y se ajusta el tamaño de la pantalla con el tamaño de cada imagen
Divertido !

  1. GraphicsWindow.Title =      «imagen»
  2. For i = 1 To 10
  3. img =      Flickr.GetRandomPicture(«animals»)
  4. Ancho =      ImageList.GetWidthOfImage(img)
  5. Alto =      ImageList.GetHeightOfImage(img)
  6. GraphicsWindow.Width = Ancho
  7. GraphicsWindow.Height = Alto
  8. GraphicsWindow.DrawResizedImage(img,      0, 0, Ancho, Alto)
  9. Program.Delay(200)
  10. EndFor

Small Basic Desafío mes de Abril/ 2013 (código)


a2

  1. 1.      Community Suggestion 2 (By Nonki)
  2. http://social.msdn.microsoft.com/Forums/en-US/smallbasic/thread/7239821c-161c-4328-b29d-7c55e40b11b9
  3. 3.      Draw a picture of  cars  (Moving)   TJV532 


 ´ Challenge of the month April 2013 Moving Cars by NaochanON

shapecars()
shapes_Add()

While «true»
L_Cars_Moving()
R_Cars_Moving()
Program.Delay(50)
endwhile

Sub L_Cars_Moving
For L=1 To 5
For i=1 To 9
Shapes.Move(SHP[L][i][«obj»],Shapes.GetLeft(SHP[L][i][«obj»])-Vx[L],Shapes.GetTop(SHP[L][i][«obj»]))
EndFor
If Shapes.GetLeft(SHP[L][1][«obj»])<-200 Then
DDX=Math.GetRandomNumber(400)
For i=1 To 9
Shapes.Move(SHP[L][i][«obj»],Shapes.GetLeft(SHP[L][i][«obj»])+1300+DDX,Shapes.GetTop(SHP[L][i][«obj»]))
EndFor
EndIf
EndFor
EndSub

Sub R_Cars_Moving
For L=6 To 10
For i=1 To 9
Shapes.Move(SHP[L][i][«obj»],Shapes.GetLeft(SHP[L][i][«obj»])+Vx[L],Shapes.GetTop(SHP[L][i][«obj»]))
EndFor
If Shapes.GetLeft(SHP[L][1][«obj»])>1300 Then
DDX=Math.GetRandomNumber(400)
For i=1 To 9
Shapes.Move(SHP[L][i][«obj»],Shapes.GetLeft(SHP[L][i][«obj»])-1400-DDX,Shapes.GetTop(SHP[L][i][«obj»]))
EndFor
EndIf
EndFor
EndSub

Sub shapecars
GraphicsWindow.BackgroundColor=»Darkgreen»
GraphicsWindow.Width=1200
GraphicsWindow.Height=700
GraphicsWindow.Top=0
GraphicsWindow.Left=20
GraphicsWindow.Hide()
X0 = 0  ‘ x offset
Y0 = 0  ‘ y offset
‘————————————– Left oriented cars ——————————————————————————–
s=0.55
start=1
End=9
For L=1 To 5
shp[L][1] = «func=rect;x=4;y=23;width=130;height=25;bc=#00F0CA;pc=#000000;pw=2;»
shp[L][2] = «func=ell;x=20;y=33;width=23;height=23;bc=#9D756A;pc=#000000;pw=2;»
shp[L][3] = «func=ell;x=95;y=32;width=23;height=23;bc=#9D756A;pc=#000000;pw=2;»
shp[L][4] = «func=rect;x=48;y=2;width=54;height=23;bc=#E0F0CA;pc=#000000;pw=2;»
shp[L][5] = «func=tri;x=41;y=5;x1=7;y1=0;x2=0;y2=17;x3=15;y3=17;bc=#E0F0CA;pc=#E0F0CA;pw=2;»
shp[L][6] = «func=tri;x=91;y=5;x1=9;y1=0;x2=0;y2=17;x3=18;y3=17;bc=#E0F0CA;pc=#E0F0CA;pw=2;»
shp[L][7] = «func=ell;x=0;y=26;width=11;height=12;bc=#FFFF00;pc=#FF0000;pw=2;»
shp[L][8] = «func=ell;x=58;y=5;width=10;height=15;bc=#6A5ACD;pc=#6A5ACD;pw=4;»
shp[L][9] = «func=rect;x=56;y=20;width=15;height=10;bc=#FF5ACD;pc=#6A5ACD;pw=4;»
Shapes_Add()
DX=Math.GetRandomNumber(L+2)*130
Y_Pos()
For i=start To end
shapes.Move(SHP[L][i][«obj»],Shapes.GetLeft(SHP[L][i][«obj»])+100+DX,Shapes.GetTop(SHP[L][i][«obj»])+DY-30)
EndFor
Vx[L]=2.5+Math.GetRandomNumber(20)/10
EndFor
‘————————————– Right oriented cars ——————————————————————————–
For L=6 To 10
shp[L][1] = «func=rect;x=6;y=83;width=130;height=25;bc=#E000CA;pc=#000000;pw=2;»
shp[L][2] = «func=ell;x=20;y=93;width=23;height=23;bc=#9D756A;pc=#000000;pw=2;»
shp[L][3] = «func=ell;x=95;y=92;width=23;height=23;bc=#9D756A;pc=#000000;pw=2;»
shp[L][4] = «func=rect;x=48;y=62;width=54;height=23;bc=#E0F0CA;pc=#000000;pw=2;»
shp[L][5] = «func=tri;x=41;y=65;x1=7;y1=0;x2=0;y2=17;x3=15;y3=17;bc=#E0F0CA;pc=#E0F0CA;pw=2;»
shp[L][6] = «func=tri;x=91;y=65;x1=9;y1=0;x2=0;y2=17;x3=18;y3=17;bc=#E0F0CA;pc=#E0F0CA;pw=2;»
shp[L][7] = «func=ell;x=128;y=86;width=11;height=12;bc=#FFFF00;pc=#FF0000;pw=2;»
shp[L][8] = «func=ell;x=85;y=61;width=10;height=15;bc=#6A5ACD;pc=#6A5ACD;pw=4;»
shp[L][9] = «func=rect;x=82;y=76;width=15;height=10;bc=#FF5ACD;pc=#6A5ACD;pw=4;»
Shapes_Add()
DX=Math.GetRandomNumber(L-3)*130
Y_Pos()
For i=start To end
shapes.Move(SHP[L][i][«obj»],Shapes.GetLeft(SHP[L][i][«obj»])+500-DX,Shapes.GetTop(SHP[L][i][«obj»])+DY-30)
EndFor
Vx[L]=2.5+Math.GetRandomNumber(20)/10
EndFor
‘ ‘———————————————————————————————————————-
GraphicsWindow.Show()
EndSub

Sub shapes_Add
For i = start To End
GraphicsWindow.PenWidth = SHP[L][i][«pw»]*s
GraphicsWindow.PenColor = SHP[L][i][«pc»]
GraphicsWindow.BrushColor = SHP[L][i][«bc»]
If SHP[L][i][«func»] = «rect» Then
SHP[L][i][«obj»] = Shapes.AddRectangle(SHP[L][i][«width»]*s, SHP[L][i][«height»]*s)
ElseIf SHP[L][i][«func»] = «ell» Then
SHP[L][i][«obj»] = Shapes.AddEllipse(SHP[L][i][«width»]*s, SHP[L][i][«height»]*s)
ElseIf SHP[L][i][«func»] = «tri» Then
SHP[L][i][«obj»] = Shapes.AddTriangle(SHP[L][i][«x1»]*s, SHP[L][i][«y1»]*s, SHP[L][i][«x2»]*s, SHP[L][i][«y2»]*s, SHP[L][i][«x3»]*s, SHP[L][i][«y3»]*s)
ElseIf SHP[L][i][«func»] = «line» Then
SHP[L][i][«obj»] = Shapes.AddLine(SHP[L][i][«x1»]*s, SHP[L][i][«y1»]*s, SHP[L][i][«x2»]*s, SHP[L][i][«y2»]*s)
EndIf
Shapes.Move(SHP[L][i][«obj»], X0 + SHP[L][i][«x»]*s, Y0 + SHP[L][i][«y»]*s)
Shapes.Rotate(SHP[L][i][«obj»], SHP[L][i][«angle»])
EndFor
endsub

Sub Y_Pos
Again:
DY=(Math.GetRandomNumber(12)-1)*60
If Text.IsSubText(SDY,DY) Then
Goto Again
EndIf
SDY=SDY+DY+»;»
endsub

¿Quién hace +1 en posts de Blogger?


See on Scoop.itLas TIC en la Educación

Blog dedicado a la informática en el que se tratarán temas sobre diseño gráfico, diseño web, utilidades para hacer tus blogs más profesionales, páginas web interesantes, utilidades para windows y messenger, redes sociales, etc…

See on elblogdelainformatica10.blogspot.com.es

Small Basic Forum – Desafío del Mes – abril 2013


a2

Editado por litdev  Microsoft Community Contributor, Moderador Lunes, 01 de abril 2013 17:41
Sugerencia Comunidad 2 (Por Nonki)
(1) Dibuje la red de un dado (dados).
(2) Haz un dibujo de una flor.
(3) Haz un dibujo de un coche
Esta es mi muestra de Sugerencia Comunidad 2 (1):
Program Listing MDB491. Nonki Takahashi.

http://social.msdn.microsoft.com/Forums/en-US/smallbasic/thread/7239821c-161c-4328-b29d-7c55e40b11b9

Bienvenidos al Desafío mensual SmallBASIC! (Abril/ 2013)- código


trafico
Desafío Física: Editado por litdevMicrosoft Community Contributor, Moderador
http://social.msdn.microsoft.com/Forums/en-US/smallbasic/thread/7239821c-161c-4328-b29d-7c55e40b11b9
Escriba un programa para controlar un semáforo en un cruce donde los coches llegan de diferentes direcciones a diferentes velocidades. Si quieres un reto aún más luego añadir unas cruces de la red de carreteras y controlar  todas las luces. Las luces se pueden detectar cuando una cola se está acumulando.
Un reto difícil para algunos de ustedes puede que deseen trabajar juntos en esto.

Programa Listing TRK448-1    Editado por NaochanON

  1. ‘  Challenge of the month April 2013  …   Physics Challenge   //  Trafic  ….     by  NaochanON
  2. ‘  TRK448-1
  3. Shapes_Init()
  4. GUI()
  5. shapecars()
  1. While «true»
  2. L_Cars_Moving()
  3. R_Cars_Moving()
  4. Up_Cars_Moving()
  5. Down_Cars_Moving()
  6. RemainTime()
  7. Program.Delay(50)
  8. endwhile
  1. Sub  X_AvoidCollision
  2. For LL=(DN+2) To (DN+cars+1)
  3. If  LL<>L Then
  4. If Math.abs(Shapes.GetLeft(SHP[LL][1][«obj»])-Shapes.GetLeft(SHP[L][1][«obj»]))<160*s Then ‘  next car
  5. Vx[LL]=Vx[L]            ‘  same speed // avoid collision
  6. EndIf
  7. EndIf
  8. EndFor
  9. EndSub
  1. Sub  Y_AvoidCollision
  2. For LL=(2*cars+2+DN) To (3*cars+1+DN)
  3. If  LL<>L Then
  4. If Math.abs( Shapes.Gettop(SHP[LL][1][«obj»]) – Shapes.Gettop(SHP[L][1][«obj»]) )<140*s Then ‘  next car
  5. Vy[LL]=Vy[L]            ‘  same speed // avoid collision
  6. EndIf
  7. EndIf
  8. EndFor
  9. EndSub
  1. Sub RNDXSpeed
  2. Vx[L]= Vx[L-1]+Math.GetRandomNumber(10)/10
  3. Vx[DN+2]=4.5
  4. EndSub
  1. Sub RNDYSpeed
  2. Vy[L]= Vy[L-1]+Math.GetRandomNumber(10)/10
  3. Vy[DN+2*cars+2]=3.5
  4. EndSub
  1. Sub L_Cars_Moving
  2. DN=0
  3. For L=2 To (cars+1)
  4. Xpos[L]=Shapes.GetLeft(SHP[L][1][«obj»])
  5. ‘———————————————   Restart  ———————————————————————————————–
  6. If  LRNotice=»OK» And  -2000<Xpos[L] and Vx[L]<0.35 then        ‘    if   signal becomes «Blue»
  7. RNDXSpeed()                                                   ‘   new speed
  8. EndIf
  9. ‘———————————————   Yellow Signal  ——————————————————————————————-
  10. If  LRNotice=»Notice» And RemTime<=24 and  625<Xpos[L]  and Xpos[L]<675  then ‘//  Notice Area
  11. Vx[L]=Vx[L]*0.5                                                  ‘   speed down
  12. elseIf  LRNotice=»Notice» And  550<Xpos[L]  and Xpos[L]<625  then   ‘    Signal = «Yellow»
  13. Vx[L]=Vx[L]+0.75                                                 ‘   speed down
  14. EndIf
  15. ‘———————————————   Red Signal  ——————————————————————————————-
  16. If  LRNotice=»NG» And  625<Xpos[L]  and Xpos[L]<675  then       ‘    Signal = «Red»
  17. Vx[L]=0                                                       ‘   speed down
  18. EndIf
  19. ‘———————————————   car move  // avoid collision   ———————————————————————–
  20. For i=start To end
  21. Shapes.Move(SHP[L][i][«obj»],Shapes.GetLeft(SHP[L][i][«obj»])-Vx[L],Shapes.GetTop(SHP[L][i][«obj»]))
  22. EndFor
  23. X_AvoidCollision()                                              ‘   speed  control
  24. ‘———————————————–   go over left    next position  ————————————————————————-
  25. If Xpos[L]<-(300+135*L) Then
  26. RNDX=1300 -Xpos[L]+ 135*L*2
  27. For i=start To end
  28. shapes.Move(SHP[L][i][«obj»],Shapes.GetLeft(SHP[L][i][«obj»])+Rndx,Shapes.GetTop(SHP[L][i][«obj»]))
  29. endfor
  30. RNDXSpeed()
  31. endif
  32. EndFor
  33. EndSub
  1. Sub R_Cars_Moving
  2. DN=cars
  3. For L=(cars+2) To (2*cars+1)
  4. Xpos[L]=Shapes.GetLeft(SHP[L][1][«obj»])
  5. ‘———————————————   Restart  ———————————————————————————————–
  6. If  LRNotice=»OK» And  -2000<Xpos[L] and Vx[L]<0.35 then       ‘    if   signal becomes «Blue»
  7. RNDXSpeed()                                                  ‘   new speed
  8. EndIf
  9. ‘———————————————   Yellow Signal  ——————————————————————————————-
  10. If  LRNotice=»Notice» And RemTime<=24 and  370<Xpos[L]  and Xpos[L]<400  then  ‘    Notice area
  11. Vx[L]=Vx[L]*0.5                                              ‘   speed down
  12. elseIf  LRNotice=»Notice» And  345<Xpos[L]  and Xpos[L]<420  then
  13. Vx[L]=Vx[L]+0.75                                             ‘   speed down
  14. EndIf
  15. ‘———————————————   Red Signal  ——————————————————————————————-
  16. If  LRNotice=»NG» And  365<Xpos[L]  and Xpos[L]<390  then      ‘    Signal = «Red»
  17. Vx[L]=0                                                      ‘   speed down
  18. EndIf
  19. ‘———————————————   car move  // avoid collision   ———————————————————————–
  20. For i=start To end
  21. Shapes.Move(SHP[L][i][«obj»],Shapes.GetLeft(SHP[L][i][«obj»])+Vx[L],Shapes.GetTop(SHP[L][i][«obj»]))
  22. EndFor
  23. X_AvoidCollision()                                             ‘   speed  control
  24. ‘———————————————–   go over left    next position  ————————————————————————-
  25. If 1000+135*L<Xpos[L] Then
  26. RNDX=-(Xpos[L]+ 135*L*2)
  27. For i=start To end
  28. shapes.Move(SHP[L][i][«obj»],Shapes.GetLeft(SHP[L][i][«obj»])+Rndx,Shapes.GetTop(SHP[L][i][«obj»]))
  29. endfor
  30. RNDXSpeed()
  31. endif
  32. EndFor
  33. EndSub
  1. Sub Up_Cars_Moving
  2. DN=0
  3. For L=(2*cars+2) To (3*cars+1)
  4. Ypos[L]=Shapes.Gettop(SHP[L][1][«obj»])
  5. ‘———————————————   Restart  ———————————————————————————————–
  6. If  UDNotice=»OK» And  -2000<Ypos[L] and Vy[L]<0.35 then        ‘    if   signal becomes «Blue»
  7. RNDYSpeed()                                                   ‘   new speed
  8. EndIf
  9. ‘———————————————   Yellow Signal  ——————————————————————————————-
  10. If  UDNotice=»Notice» And RemTime<=3 and  425<Ypos[L]  and Ypos[L]<450  then  ‘    Notice Area
  11. Vy[L]=Vy[L]*0.75                                              ‘   speed down
  12. elseIf  UDNotice=»Notice» And  350<Ypos[L]  and Ypos[L]<440  then  ‘    Signal = «Yellow»
  13. Vy[L]=Vy[L]+0.75                                              ‘   speed down
  14. EndIf
  15. ‘———————————————   Red Signal  ——————————————————————————————-
  16. If  UDNotice=»NG» And  425<Ypos[L]  and Ypos[L]<450  then       ‘    Signal = «Red»
  17. Vy[L]=0                                                       ‘   speed down
  18. EndIf
  19. ‘———————————————   car move  // avoid collision   ———————————————————————–
  20. For i=1 To 8
  21. Shapes.Move(SHP[L][i][«obj»],Shapes.GetLeft(SHP[L][i][«obj»]),Shapes.GetTop(SHP[L][i][«obj»])-VY[L])
  22. EndFor
  23. Y_AvoidCollision()                                              ‘   speed  control
  24. ‘———————————————–   go over left    next position  ————————————————————————-
  25. If Ypos[L]< -135*(L-2*cars) Then
  26. RNDY=600 -Ypos[L]+ 135*(L-2*cars)*2
  27. For i=start To end-1
  28. shapes.Move(SHP[L][i][«obj»],Shapes.GetLeft(SHP[L][i][«obj»]),Shapes.GetTop(SHP[L][i][«obj»])+RNDY)
  29. endfor
  30. RNDYSpeed()
  31. endif
  32. EndFor
  33. EndSub
  1. Sub Down_Cars_Moving
  2. DN=cars
  3. For L=(3*cars+2) To (4*cars+1)
  4. Ypos[L]=Shapes.Gettop(SHP[L][1][«obj»])
  5. ‘———————————————   Restart  ———————————————————————————————–
  6. If  UDNotice=»OK» And  -2000<Ypos[L] and Vy[L]<0.35 then       ‘    if   signal becomes «Blue»
  7. RNDYSpeed()                                                  ‘   new speed
  8. EndIf
  9. ‘———————————————   Yellow Signal  ——————————————————————————————-
  10. If  UDNotice=»Notice» And RemTime<=3 and  180<Ypos[L]  and Ypos[L]<205  then  ‘   Notice Area
  11. Vy[L]=Vy[L]*0.75                                             ‘   speed down
  12. elseIf  UDNotice=»Notice» And  165<Ypos[L]  and Ypos[L]<250  then  ‘    Signal = «Yellow»
  13. Vy[L]=Vy[L]+0.75                                             ‘   speed down
  14. EndIf
  15. ‘———————————————   Red Signal  ——————————————————————————————-
  16. If  UDNotice=»NG» And  180<Ypos[L]  and Ypos[L]<205  then      ‘    Signal = «Red»
  17. Vy[L]=0                                                      ‘   speed down
  18. EndIf
  19. ‘———————————————   car move  // avoid collision   ———————————————————————–
  20. For i=1 To 8
  21. Shapes.Move(SHP[L][i][«obj»],Shapes.GetLeft(SHP[L][i][«obj»]),Shapes.GetTop(SHP[L][i][«obj»])+VY[L])
  22. EndFor
  23. Y_AvoidCollision()                                             ‘   speed  control
  24. ‘———————————————–   go over left    next position  ————————————————————————-
  25. If Ypos[L]> 700+135*(L-3*cars-1) Then
  26. RNDY=-Ypos[L]- 135*(L-3*cars-1)*2
  27. For i=start To end-1
  28. shapes.Move(SHP[L][i][«obj»],Shapes.GetLeft(SHP[L][i][«obj»]),Shapes.GetTop(SHP[L][i][«obj»])+RNDY)
  29. endfor
  30. RNDYSpeed()
  31. endif
  32. EndFor
  33. EndSub
  1. Sub RemainTime
  2. CycleTime=40                                                ‘    LR ; 40 sec   UD ; 40 sec
  3. DT=(Clock.ElapsedMilliseconds-t0)/1000                      ‘   Elapsed time ;  sec
  4. RemTime=text.GetSubText(1000+math.round(CycleTime-DT),2,3)  ‘   Remained time  ( Count down)
  5. For k=21 To 24
  6. Shapes.SetText( SHP[1][K][«obj»],RemTime)                 ‘   show  remained time
  7. EndFor
  8. If (CycleTime/2>DT and DT>=CycleTime/2-10)  Then            ‘   LR trafic  ;  Yellow signal blinking
  9. blink_LR_Yellow()
  10. elseIf (CycleTime>DT and DT>=CycleTime-10)  Then            ‘   UD trafic  ;  Yellow signal blinking
  11. blink_UD_Yellow()
  12. elseIf CycleTime/2+1>DT and DT>=CycleTime/2 Then            ‘  UD trafic  ;  Can Go !  Signals for UD  :Blue
  13. UD_Trafic_Go()
  14. elseIf CycleTime+1>DT and DT>=CycleTime Then                ‘  LR trafic  ;  Can Go !   Signals for LR  :Blue
  15. LR_Trafic_Go()
  16. t0= Clock.ElapsedMilliseconds                             ‘  CycleTime reset
  17. DT=0
  18. EndIf
  19. endsub
  1. Sub LR_Trafic_Go
  2. LRNotice=»OK»
  3. UDNotice=»NG»
  4. ON[«R»]=»1=1;2=1;3=0;4=0″
  5. ON[«Y»]=»1=0;2=0;3=0;4=0″
  6. ON[«B»]=»1=0;2=0;3=1;4=1″
  7. LightON()
  8. endsub
  1. Sub blink_LR_Yellow
  2. LRNotice=»Notice»
  3. UDNotice=»NG»
  4. ON[«R»]=»1=1;2=1;3=0;4=0″
  5. ON[«Y»]=»1=0;2=0;3=1;4=1″   ‘  for  LR
  6. ON[«B»]=»1=0;2=0;3=0;4=0″
  7. LightON()
  8. Program.Delay(20)
  9. ON[«Y»]=»1=0;2=0;3=0;4=0″   ‘
  10. LightON()
  11. EndSub
  1. Sub blink_UD_Yellow
  2. LRNotice=»NG»
  3. UDNotice=»Notice»
  4. ON[«R»]=»1=0;2=0;3=1;4=1″
  5. ON[«Y»]=»1=1;2=1;3=0;4=0″  ‘  for UD
  6. ON[«B»]=»1=0;2=0;3=0;4=0″
  7. LightON()
  8. Program.Delay(20)
  9. ON[«Y»]=»1=0;2=0;3=0;4=0″   ‘
  10. LightON()
  11. EndSub
  1. Sub UD_Trafic_Go
  2. LRNotice=»NG»
  3. UDNotice=»OK»
  4. ON[«R»]=»1=0;2=0;3=1;4=1″
  5. ON[«Y»]=»1=0;2=0;3=0;4=0″
  6. ON[«B»]=»1=1;2=1;3=0;4=0″
  7. LightON()
  8. endsub
  1. Sub AllClear
  2. ON[«R»]=»1=0;2=0;3=0;4=0″
  3. ON[«Y»]=»1=0;2=0;3=0;4=0″
  4. ON[«B»]=»1=0;2=0;3=0;4=0″
  5. LightON()
  6. endsub
  1. Sub LightON
  2. For k=1 To 4     ‘  1,2   Left  Upper &  Right Lower    3 ,4  Right  Upper &  Left Lower
  3. shapes.SetOpacity(SHP[1][5*(K-1)+3][«obj»],10+90*ON[«R»][K])  ‘  Red
  4. shapes.SetOpacity(SHP[1][5*(K-1)+4][«obj»],10+90*ON[«Y»][K])  ‘  Yellow
  5. shapes.SetOpacity(SHP[1][5*(K-1)+5][«obj»],10+90*ON[«B»][K])  ‘  Blue
  6. endfor
  7. EndSub
  1. Sub Shapes_Init
  2. X0 = 250  ‘ x offset
  3. Y0 = 150  ‘ y offset
  4. ‘———————————————————————————————————————-
  5. shp[1][1] = «func=rect;x=213;y=50;width=26;height=85;bc=#3B9440;pc=#3B9440;pw=2;»   ‘  Left  Upper
  6. shp[1][2] = «func=rect;x=224;y=135;width=8;height=16;bc=#000000;pc=#000000;pw=2;»   ‘  Pole
  7. shp[1][3] = «func=ell;x=220;y=80;width=14;height=15;bc=#FF0000;pc=#FF0000;pw=2;»    ‘  Red
  8. shp[1][4] = «func=ell;x=220;y=98;width=14;height=15;bc=#FFFF00;pc=#FFFF00;pw=2;»    ‘  Yellow
  9. shp[1][5] = «func=ell;x=220;y=116;width=14;height=14;bc=#0000FF;pc=#0000FF;pw=2;»   ‘  Blue
  10. ‘———————————————————————————————————————-
  11. shp[1][6] = «func=rect;x=364;y=269;width=26;height=85;bc=#3B9440;pc=#3B9440;pw=2;»  ‘  Right Lower
  12. shp[1][7] = «func=rect;x=373;y=252;width=8;height=16;bc=#000000;pc=#000000;pw=2;»
  13. shp[1][8] = «func=ell;x=371;y=310;width=14;height=14;bc=#FF0000;pc=#FF0000;pw=2;»   ‘  Red
  14. shp[1][9] = «func=ell;x=371;y=292;width=14;height=14;bc=#FFFF00;pc=#FFFF00;pw=2;»   ‘  Yellow
  15. shp[1][10] = «func=ell;x=371;y=274;width=14;height=14;bc=#0000FF;pc=#0000FF;pw=2;»  ‘  Blue
  16. ‘———————————————————————————————————————-
  17. shp[1][11] = «func=rect;x=378;y=116;width=85;height=20;bc=#3B9440;pc=#3B9440;pw=2;»  ‘  Right Upper
  18. shp[1][12] = «func=rect;x=355;y=124;width=22;height=8;bc=#000000;pc=#000000;pw=2;»
  19. shp[1][13] = «func=ell;x=418;y=119;width=14;height=14;bc=#FF0000;pc=#FF0000;pw=2;»   ‘  Red
  20. shp[1][14] = «func=ell;x=400;y=119;width=14;height=14;bc=#FFFF00;pc=#FFFF00;pw=2;»   ‘  Yellow
  21. shp[1][15] = «func=ell;x=382;y=119;width=14;height=14;bc=#0000FF;pc=#0000FF;pw=2;»   ‘  Blue
  22. ‘———————————————————————————————————————-
  23. shp[1][16] = «func=rect;x=145;y=259;width=85;height=24;bc=#3B9440;pc=#3B9440;pw=2;»  ‘  Left  Lower
  24. shp[1][17] = «func=rect;x=231;y=267;width=16;height=8;bc=#000000;pc=#000000;pw=2;»
  25. shp[1][18] = «func=ell;x=177;y=263;width=14;height=14;bc=#FF0000;pc=#FF0000;pw=2;»   ‘  Red
  26. shp[1][19] = «func=ell;x=194;y=263;width=14;height=14;bc=#FFFF00;pc=#FFFF00;pw=2;»   ‘  Yellow
  27. shp[1][20] = «func=ell;x=213;y=263;width=14;height=14;bc=#0000FF;pc=#0000FF;pw=2;»   ‘  Blue
  28. ‘———————————————————————————————————————-
  29. shp[1][21] = «func=text;x=216;y=60;text=120;bc=#FF0000;fs=14;fn=Coulier New;»        ‘   Remaining time  #1  Left Upper
  30. shp[1][22] = «func=text;x=366;y=330;text=120;bc=#FF0000;fs=14;fn=Coulier New;»       ‘   Remaining time  #1  Right Lower
  31. shp[1][23] = «func=text;x=438;y=116;text=120;bc=#FF0000;fs=14;fn=Coulier New;»        ‘   Remaining time  #2  Right Upper
  32. shp[1][24] = «func=text;x=151;y=262;text=120;bc=#FF0000;fs=14;fn=Coulier New;»        ‘   Remaining time  #1  Left Lowerer
  33. EndSub
  1. Sub shapecars
  2. ‘————————————–  Left oriented cars ——————————————————————————–
  3. s=0.55
  4. start=1
  5. End=9
  6. cars=5
  7. For L=2 To (cars+1)
  8. shp[L][1] = «func=rect;x=4;y=23;width=130;height=25;bc=#00F0CA;pc=#000000;pw=2;»
  9. shp[L][2] = «func=ell;x=20;y=33;width=23;height=23;bc=#9D756A;pc=#000000;pw=2;»
  10. shp[L][3] = «func=ell;x=95;y=32;width=23;height=23;bc=#9D756A;pc=#000000;pw=2;»
  11. shp[L][4] = «func=rect;x=48;y=2;width=54;height=23;bc=#E0F0CA;pc=#000000;pw=2;»
  12. shp[L][5] = «func=tri;x=41;y=5;x1=7;y1=0;x2=0;y2=17;x3=15;y3=17;bc=#E0F0CA;pc=#E0F0CA;pw=2;»
  13. shp[L][6] = «func=tri;x=91;y=5;x1=9;y1=0;x2=0;y2=17;x3=18;y3=17;bc=#E0F0CA;pc=#E0F0CA;pw=2;»
  14. shp[L][7] = «func=ell;x=0;y=26;width=11;height=12;bc=#FFFF00;pc=#FF0000;pw=2;»
  15. shp[L][8] = «func=ell;x=58;y=5;width=10;height=15;bc=#6A5ACD;pc=#6A5ACD;pw=4;»
  16. shp[L][9] = «func=text;x=80;y=5;text=»+(L-1)+»;bc=#FF0000;fs=22;fn=Coulier New;»
  17. Shapes_Add()
  18. For i=start To end
  19. shapes.Move(SHP[L][i][«obj»],Shapes.GetLeft(SHP[L][i][«obj»])+700+(L-2)*160,Shapes.GetTop(SHP[L][i][«obj»])+210)
  20. EndFor
  21. RNDXSpeed()
  22. EndFor
  23. ‘————————————– Right oriented cars ——————————————————————————–
  24. For L=(cars+2) To (2*cars+1)
  25. shp[L][1] = «func=rect;x=6;y=83;width=130;height=25;bc=#E000CA;pc=#000000;pw=2;»
  26. shp[L][2] = «func=ell;x=20;y=93;width=23;height=23;bc=#9D756A;pc=#000000;pw=2;»
  27. shp[L][3] = «func=ell;x=95;y=92;width=23;height=23;bc=#9D756A;pc=#000000;pw=2;»
  28. shp[L][4] = «func=rect;x=48;y=62;width=54;height=23;bc=#E0F0CA;pc=#000000;pw=2;»
  29. shp[L][5] = «func=tri;x=41;y=65;x1=7;y1=0;x2=0;y2=17;x3=15;y3=17;bc=#E0F0CA;pc=#E0F0CA;pw=2;»
  30. shp[L][6] = «func=tri;x=91;y=65;x1=9;y1=0;x2=0;y2=17;x3=18;y3=17;bc=#E0F0CA;pc=#E0F0CA;pw=2;»
  31. shp[L][7] = «func=ell;x=128;y=86;width=11;height=12;bc=#FFFF00;pc=#FF0000;pw=2;»
  32. shp[L][8] = «func=ell;x=85;y=61;width=10;height=15;bc=#6A5ACD;pc=#6A5ACD;pw=4;»
  33. shp[L][9] = «func=text;x=60;y=60;text=»+(L-cars-1)+»;bc=#FF0000;fs=22;fn=Coulier New;»
  34. Shapes_Add()
  35. For i=start To end
  36. shapes.Move(SHP[L][i][«obj»],Shapes.GetLeft(SHP[L][i][«obj»])-200-(L-cars-2)*160,Shapes.GetTop(SHP[L][i][«obj»])+125)
  37. EndFor
  38. RNDXSpeed()
  39. EndFor
  40. ‘—————————————Up oriented cars ——————————————————————————-
  41. end2=8
  42. For L=(2*cars+2) To (3*cars+1)
  43. shp[L][1] = «func=ell;x=2;y=0;width=34;height=93;bc=#DBD229;pc=#DBD229;pw=2;»
  44. shp[L][2] = «func=ell;x=2;y=7;width=11;height=7;bc=#FF0000;pc=#FF0000;pw=2;»
  45. shp[L][3] = «func=ell;x=25;y=7;width=11;height=7;bc=#FF0000;pc=#FF0000;pw=2;»
  46. shp[L][4] = «func=rect;x=31;y=19;width=6;height=14;bc=#000000;pc=#6A5ACD;pw=2;»
  47. shp[L][5] = «func=rect;x=1;y=19;width=6;height=14;bc=#000000;pc=#6A5ACD;pw=2;»
  48. shp[L][6] = «func=rect;x=0;y=60;width=6;height=14;bc=#000000;pc=#6A5ACD;pw=2;»
  49. shp[L][7] = «func=rect;x=31;y=60;width=6;height=14;bc=#000000;pc=#6A5ACD;pw=2;»
  50. shp[L][8] = «func=text;x=12;y=35;text=»+(L-2*cars-1)+»;bc=#FF0000;fs=22;fn=Coulier New;»
  51. Shapes_Add()
  52. For i=start To end2
  53. shapes.Move(SHP[L][i][«obj»],Shapes.GetLeft(SHP[L][i][«obj»])+260,Shapes.GetTop(SHP[L][i][«obj»])+500+(L-(2*cars+2))*160)
  54. EndFor
  55. RNDYSpeed()
  56. EndFor
  57. ‘—————————————Down oriented cars ——————————————————————————-
  58. For L=(3*cars+2) To (4*cars+1)
  59. shp[L][1] = «func=ell;x=2;y=0;width=34;height=93;bc=#E090CA;pc=#DBD229;pw=2;»
  60. shp[L][2] = «func=ell;x=2;y=77;width=11;height=7;bc=#FF0000;pc=#FF0000;pw=2;»
  61. shp[L][3] = «func=ell;x=25;y=77;width=11;height=7;bc=#FF0000;pc=#FF0000;pw=2;»
  62. shp[L][4] = «func=rect;x=31;y=19;width=6;height=14;bc=#000000;pc=#6A5ACD;pw=2;»
  63. shp[L][5] = «func=rect;x=1;y=19;width=6;height=14;bc=#000000;pc=#6A5ACD;pw=2;»
  64. shp[L][6] = «func=rect;x=0;y=60;width=6;height=14;bc=#000000;pc=#6A5ACD;pw=2;»
  65. shp[L][7] = «func=rect;x=31;y=60;width=6;height=14;bc=#000000;pc=#6A5ACD;pw=2;»
  66. shp[L][8] = «func=text;x=12;y=40;text=»+(L-3*cars-1)+»;bc=#FF0000;fs=22;fn=Coulier New;»
  67. Shapes_Add()
  68. For i=start To end2
  69. shapes.Move(SHP[L][i][«obj»],Shapes.GetLeft(SHP[L][i][«obj»])+320,Shapes.GetTop(SHP[L][i][«obj»])-130-( L – (3*cars+2) )*160)
  70. EndFor
  71. RNDYSpeed()
  72. EndFor
  73. ‘ ‘———————————————————————————————————————-
  74. GraphicsWindow.Show()
  75. t0= Clock.ElapsedMilliseconds   ‘   start tim
  76. EndSub
  1. Sub GUI
  2. GraphicsWindow.Title=» Trafic Signals and Car action  «
  3. GraphicsWindow.top=10
  4. GraphicsWindow.Left=20
  5. GraphicsWindow.Hide()
  6. GraphicsWindow.Width=1200
  7. GraphicsWindow.Height=700
  8. GraphicsWindow.BackgroundColor=»DarkGreen»
  9. GraphicsWindow.BrushColor=»Gray»
  10. GraphicsWindow.PenColor=»Gray»
  11. GraphicsWindow.FillEllipse(50,-50,1000,770)
  12. GraphicsWindow.BrushColor=»DarkGreen»
  13. GraphicsWindow.PenColor=»DarkGreen»
  14. GraphicsWindow.FillEllipse(100,-10,900,680)
  15. GraphicsWindow.BrushColor=»Gray»
  16. GraphicsWindow.PenColor=»Gray»
  17. GraphicsWindow.FillRectangle(-100,300,1400,100)
  18. GraphicsWindow.FillRectangle(500,-100,100,1000)
  1. GraphicsWindow.BrushColor=»White»
  2. GraphicsWindow.PenColor=»White»
  3. For i=1 To 20
  4. GraphicsWindow.FillRectangle(30+(i-1)*100,350-5,30,5)
  5. GraphicsWindow.FillRectangle(550,-30+(i-1)*80,5,30)
  6. endfor
  7. GraphicsWindow.FillRectangle(475,300,5,30)
  8. GraphicsWindow.FillRectangle(625,370,5,30)
  9. GraphicsWindow.FillRectangle(500,418,35,5)
  10. GraphicsWindow.FillRectangle(565,275,35,5)
  11. STPX=»1=475;2=625;3=500;4=565″      ‘  stop Line
  12. STPY=»1=300;2=370;3=418;4=275″
  13. ‘———————————————————————————————————————-
  14. s=1
  15. L=1
  16. start=1
  17. End=24
  18. Shapes_Add()
  19. AllClear()
  20. LR_Trafic_Go()
  21. EndSub
  1. Sub shapes_Add
  2. For i = start To End
  3. GraphicsWindow.PenWidth = SHP[L][i][«pw»]*s
  4. GraphicsWindow.PenColor = SHP[L][i][«pc»]
  5. GraphicsWindow.BrushColor = SHP[L][i][«bc»]
  6. If SHP[L][i][«func»] = «rect» Then
  7. SHP[L][i][«obj»] = Shapes.AddRectangle(SHP[L][i][«width»]*s, SHP[L][i][«height»]*s)
  8. ElseIf SHP[L][i][«func»] = «ell» Then
  9. SHP[L][i][«obj»] = Shapes.AddEllipse(SHP[L][i][«width»]*s, SHP[L][i][«height»]*s)
  10. ElseIf SHP[L][i][«func»] = «tri» Then
  11. SHP[L][i][«obj»] = Shapes.AddTriangle(SHP[L][i][«x1»]*s, SHP[L][i][«y1»]*s, SHP[L][i][«x2»]*s, SHP[L][i][«y2»]*s, SHP[L][i][«x3»]*s, SHP[L][i][«y3»]*s)
  12. ElseIf shp[L][i][«func»] = «text» Then
  13. fs = shp[L][i][«fs»]
  14. GraphicsWindow.FontSize = fs * s
  15. GraphicsWindow.FontName = shp[L][i][«fn»]
  16. shp[L][i][«obj»] = Shapes.AddText(shp[L][i][«text»])
  17. EndIf

Shapes.Move(SHP[L][i][«obj»], X0 + SHP[L][i][«x»]*s, Y0 + SHP[L][i][«y»]*s)

EndFor

endsub

Plantillas de bases de datos para crear aplicaciones completas


Access 2010 incluye un conjunto de plantillas de bases de datos de diseño profesional para el seguimiento de contactos, tareas, eventos, estudiantes y activos, entre otros tipos de datos. Se pueden usar tal cual o se pueden mejorar y perfeccionar para realizar el seguimiento de la información exactamente del modo en el que desee.

a25

Cada plantilla es una aplicación de seguimiento completa que incluye tablas, formularios, informes, consultas, macros y relaciones predefinidos. Las plantillas se han diseñado de modo que se puedan usar inmediatamente. Si el diseño de la plantilla se ajusta a sus necesidades, podrá usarla tal cual. De lo contrario, podrá usarla para crear más rápidamente una base de datos que se ajuste a sus necesidades específicas.

a26

Además de las plantillas incluidas en Access 2010, se puede conectar a Office.comy descargar más plantillas.

Elementos de aplicación para agregar funcionalidad a una base de datos existente

Puede agregar funcionalidad a una base de datos existente fácilmente mediante el uso de un elemento de la aplicación. Como novedad en Access 2010, un elemento de aplicación es una plantilla que incluye parte de una base de datos, por ejemplo, una tabla con formato previo, o bien una tabla con un formulario y un informe asociados. Por ejemplo, si agrega un elemento de la aplicación Tareas a la base de datos, tendrá una tabla Tareas, un formulario Tareas y la opción de relacionar la tabla Tareas con otra tabla de la base de datos.

http://office.microsoft.com/es-hn/access-help/novedades-de-microsoft-access-HA010342117.aspx?CTT=5&origin=HA010341722#BM0

Tancraft (Desarrollado con Small Basic)


a24
Aquí hay otro juego que hice con pequeña base. La llamé Tancraft. Es un juego de 2 jugadores se puede jugar con uno de tus amigos.

Estoy muy agradecido a litdev por sus impresionantes extensiones. Usé su extensión para usar una imagen animada (la explosión de los tanques) en mi juego.

Al principio cada jugador coloca sus tanques en cualquier lugar en su propia tierra (tierras están separadas con la línea roja), y luego a partir del mejor jugador hace clic en algún lugar que poseen tierras. Una vez que se hace clic allí el punto correspondiente en el otro lado de la línea roja  será destruído. Si hay tanque del enemigo allí el tanque explotaría.

Puedes descargar el juego desde aquí (en la parte superior de la página)
Behnam Azizi

http://gallery.technet.microsoft.com/Tanks-Game-a619a22a

Como sacar el IVA y calcularlo en Excel


iva


// // El IVA es el Impuesto al Valor Agregado y para sacar el IVA es necesario aprender a sacar porcentajes. Veamos como funciona.

Como ejemplo vamos a tomar Argentina, donde el IVA es el 21%.

Un productor le vende una vaca a $100 + IVA (21%) al carnicero. El carnicero paga $121. El IVA lo podemos calcular con una regla de tres simple:

  • 21% * $100 / 100% = $21

El IVA que está pagando el carnicero es de $21. Y es el impuesto que el productor debe pagarle al fisco.

Nuestro carnicero corta en pedacitos esa vaca y la vende para un gran asado en su carnicería. Un cliente o consumidor final le paga al carnicero $120 + IVA (21%).

  • 21% * $120 / 100% = $25,2

Entonces el cliente debe pagar $145,2 y el carnicero debe pagar al fisco $4,2. ¿Porqué el carnicero no paga la totalidad del 21% al fisco? Porque el IVA es un impuesto al consumo, no de insumos ni servicios, esto quiere decir que se va neutralizando en forma de cascada hasta llegar al consumidor final.

Excluyendo al consumidor final, para el resto de los integrantes de la cadena comercial, el efecto del IVA es neutro.

Fórmula para sacar el IVA en Excel

Seguimos con el ejemplo de Argentina, donde el IVA es del 21%.

  • En la celda A2 escribe: =A1*21%
  • En la celda A3 escribe: =SUMA(A1:A2)
  • En la celda A1 escribe el valor al que      quieres sacarle el IVA.

Bien, en la celda A2 dará como resultado el valor del IVA. Y en la celda A3 obtendrás como resultado el valor del IVA sumado al valor del producto.

El IVA por país

  • Argentina: 21% 
  • Bolivia: 13%
  • Chile: 19%
  • Colombia: 16%
  • Ecuador: 12%
  • Paraguay: entre un 5% y 10%
  • Perú: 16% 
  • Uruguay: entre 14% y 23% 
  • Venezuela: entre 8% y 16,5% 
  • Brasil: entre 7% y 25%

http://todosloscomo.com/2010/10/06/sacar-iva-excel-calcular/

Matemáticas,
Negocios
y Finanzas
, Software
y con las etiquetas afip,
calcular impuesto ganancias, impuesto a las ganancias, Negocios
y Finanzas
, sacar IVA